You’ve soared like a god all day, and now it is time to get back on the ground. How do you get close enough to it that you can touch down exactly where you want, with all your energy spent? This lesson will demonstrate the 2/3 airbrake approach at the intended minimum approach speed. The next lesson(s) will demonstrate the use of airbrakes to correct any undershoot or overshoot. Roundout follows, to avoid hitting the ground.
Learning Points
Approach Cone
When looking at circuits we discussed the Approach Path. This links the Final Turn to the Reference Point in a straight line. We have said it is flown with 2/3 airbrakes, which implies the glider is flying down a steady path and therefore from a fixed height at the start of the leg. In practise it doesn’t quite work like that, but we try.
Exiting the Final Turn, we could fly with no airbrakes, and would probably overshoot the airfield by a considerable margin. Alternatively we could fully deploy the airbrakes and come down short of the runway. There is a cone of possibilities projecting forward from us, and we have the task of arriving to round out at the chosen spot within it. This is done by using the airbrakes to control the descent. Judging where to place the Final Turn so that the approach path requires 2/3 airbrakes will come with experience.
Why two-thirds airbrake?
It provides a good rate of descent, with a usable margin either side. If we hit sink, we can arrest our descent by closing the airbrakes. It is possible to hit lift as well (although less likely!) but we may have misjudged the height of the Final Turn and come out a little high, in which case we can use full airbrakes to steepen the descent path. When adjusting the airbrakes, you are approaching the edge of your cone of possibilities – and hence reducing your options in that direction. The best way to manage this is to make early, deliberate and significant changes of the airbrake setting to get back on to the ‘two-thirds’ path, and to reset the airbrakes once there.
Reference Point (RP)
The reference point is the point on the ground that you would hit if you didn’t round out. It should be selected with reference to the landing area. When setting up the circuit, decide where you are going to land, then allow for the ground run, float, and roundout running up to it. This is probably a distance of up to 200m or so at a minimum approach speed. The reference point must be some way upwind of any obstacles on approach. In a good sized field, you might place it a third of the way into the field. Beware though – a glider will float a long way if allowed to! When at an airfield, you’ll already have received plenty of advice about where to land, and where the reference points might be. As you progress, work on the basis of selecting your landing area and work back from it. There are no predefined reference points for field landings – you must be able to work back from the landing area. Having picked your spot, identify it by markings on the ground or objects nearby.

Controlling your arrival
Managing your descent along the approach path is simple really:
- Manage your speed. Use the elevator, and refer to the ASI frequently. Check the attitude when not looking at the ASI. If tempted to ease the stick forward, to point at (or even see) the reference point, you’ll find it is a good way to pitch down, accelerate and arrive at the roundout way too fast to land in the space available.
- Manage the descent path. Use the airbrakes to add or remove sink as needed. This is judged by looking for Undershoot or Overshoot. Having settled at your approach speed, look at the reference point, and note its location in the canopy. Watch for movement up or down the view.
Undershoot
Undershoot will result in arriving at the ground further downwind than intended i.e. nearer to the Final Turn. This is detected by seeing the reference point move up in your view, and assumes you have kept the attitude steady. What to do if you are undershooting? You need to descend less rapidly, and therefore close the airbrakes. Open them again when the reference point is on the two-thirds airbrake descent path.
Overshoot
In this situation you will fly over and beyond the reference point. This is detected by seeing the reference point slide down in your view, assuming the attitude remains constant. In this situation, open the airbrakes fully to increase the rate of descent. Intersect the two thirds line, and adjust again.
Constant Attitude
Did you notice that the additional benefit of keeping the attitude constant? It allows you to ‘fix’ the reference point in your view, and adjust airbrakes accordingly. We saw earlier that some gliders change their attitude when airbrakes are adjusted, so this must be taken into account.
Timing of Adjustments
The best time to adjust the descent path is as soon as possible after the Final Turn. Making significant adjustments to the airbrakes close to the ground is not advisable due to their impact on pitch and the rate of descent. Do not open them close to the ground in any sort of nose down attitude.
Wind Gradient
A wind gradient is where the wind increases with height. This can happens for all sorts of reasons. On windy and gusty days the air drags more slowly at ground level and can accelerate greatly over a hundred feet or so. Hill top sites will be familiar with this too. Obstacles such as trees to windward will also create a wind shadow where the air is moving much more slowly at ground level, in this case maybe as low as 30 feet. At a ridge site, landing into wind coming over the ridge, the air at circuit height will be highly accelerated, whereas at ground level it could be in shadow, possibly not moving at all, or even in the opposite direction. In these situations you must manage your approach speed carefully. Set it higher for the base and approach legs to account for the expected decrease in wind speed in the descent. Maintain it throughout. When you pass through the slower air your airspeed will drop, possibly a lot and close to the ground. You must avoid a stall, and unless you are about to round out, you must move the stick forward to maintain speed. This is usually quite close to the ground and is often followed quickly by the roundout. Speed is your friend at this point.
When to Forget the Reference Point?
The purpose of the RP is to get you to the Landing Area at the right speed, height and attitude. The Landing Area may be a moveable feast: If you are landing out, your only purpose is to land safely in the field. At a busy airfield you may be restricted in where you can land. On a purely gliding field, you may be choosing to land in just one part of the field, for ease of operations. As you approach the RP, there is a point where it has served its purpose in terms of reaching a safe place. Beyond that point, focus on maintaining a safe speed and roundout rather than ‘hitting the spot’.
Scenario and Demonstration
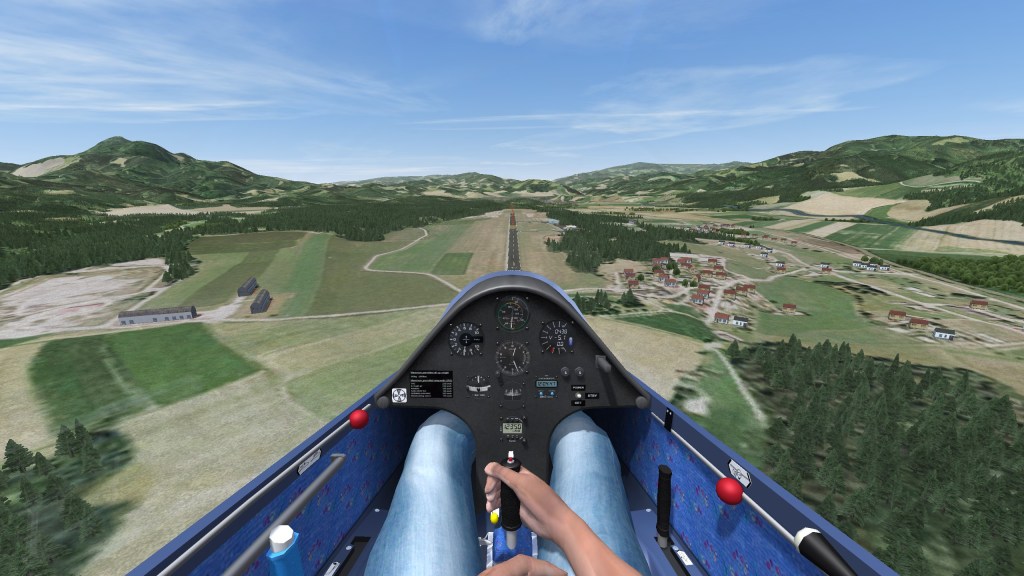
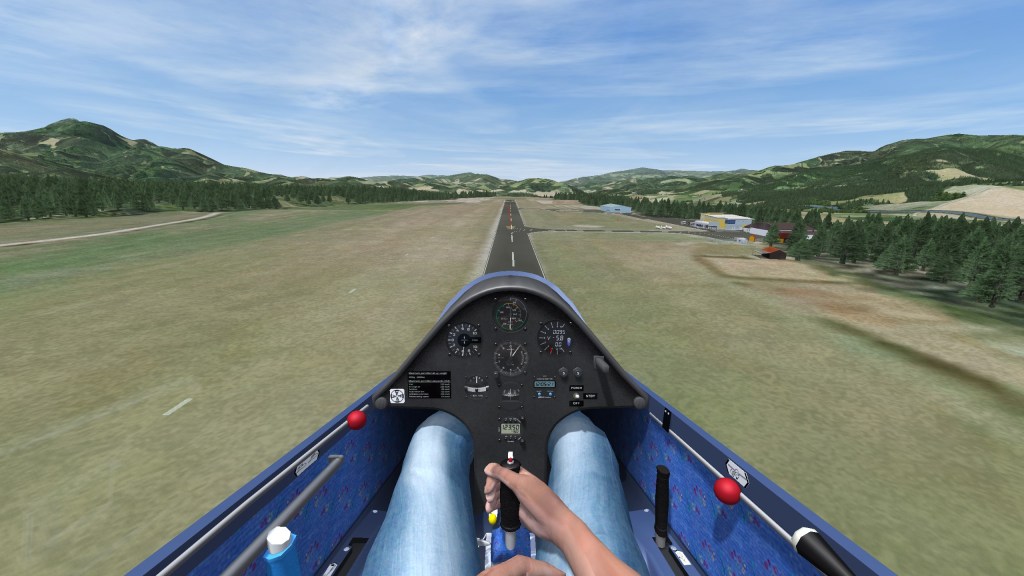
The demonstration shows a very long approach. The RP is about one third of the way along the tarmac runway, where the nearest track joins it from the right. The pilot turns for home from the hills, sights the airfield and runway, and lines up on it. When at the estimated angle for a two thirds airbrake approach she opens the airbrakes. From thereon, she monitors the airspeed, aiming to stay above 50kts, and keeps the RP constant in its position up and down the canopy. It is held just below the string. Close to the airfield boundary, the pilot feels she is a little high and so opens the airbrakes to 80% for a short while to bring the RP back where she wants it in her view, then returns the airbrakes to 60%, where they remain for the remainder of the descent.
The next lesson will show an approach that has overshoot and undershoot, and how to deal with it.
About the videos
Multiple versions of the videos are being made available:
- With animation and voiceover.
- Alternative without the animation graphics.
- As recorded in Condor Flight School. These will have messages at the top of the screen, with no additional animation or voiceover – that’s the way the Condor cookie crumbles!
The videos are suited to any device that supports YouTube. If you have trouble loading the video in the browser, click on Watch on YouTube in the lower left corner.
Performing the Exercise
Line up on the runway, and open the airbrakes to two thirds when you think it is the right moment (or three clicks giving 60% if you are using Condor with airbrakes assigned to buttons). Try again from different positions. Combine this with the next lesson to ‘hit the spot’.
Further Reading and References
- Gliding From Passenger to Pilot, 2nd Edition: Page 108-111
- BGA Instructors’ Manual, 4th Edition: Section 2, Chapter 12
- BGA Instructors’ Reference Cards: Ex 12c
- Gliding: The British Gliding Association Student Pilot Manual, Section 4.9 and website.
Updates
The GlidingSchool.com lessons were developed for Condor2. They will be updated from time to time. Visit the Downloads page for news of updates, and to request the latest version.
Comments and Feedback
Your comments and feedback would be welcome. Visit the Contact page to send your thoughts.
Forums
Join us on the Forums provided by Condor Soaring and GliderPilot.net (the URAS forum).
