Introduction
Aim: You will learn how to fly the areotow launch, keeping yourself and the tug pilot safe
What do we know?
- Who here has flown an aerotow?
- What skills do you think are pre-requisites?
- Where is your focus during the flight?
- What is the risk to you?
- What is the risk to the tug pilot?
Pre-requisite skills
Upper Launch
- Ability to fly straight:
- indicates an ability to detect and correct small angles of bank
Ground Run and Lower Launch
- Ability to pat head and rub tummy: independent use of ailerons and rudder, while controlling elevator
- Ability to maintain position behind the tug
Upper Launch
Vertical Positioning
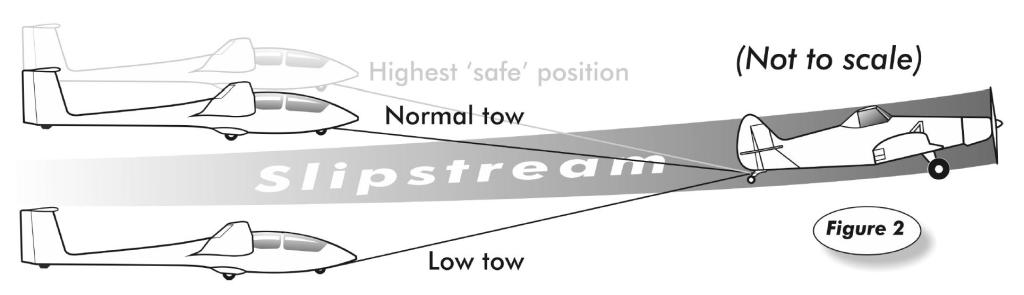
Positioning is relative to the Tug’s Slipstream:
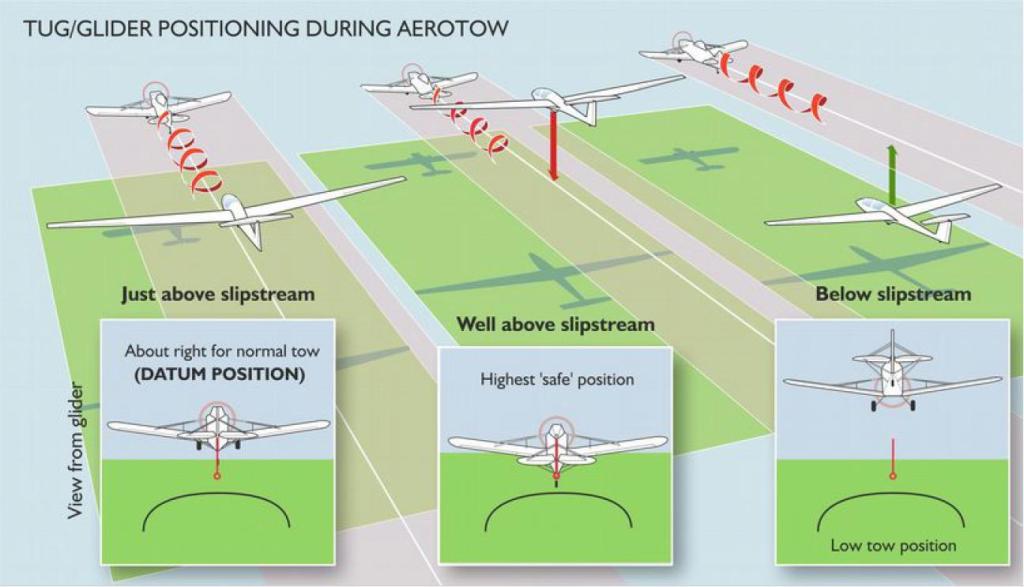
Method to maintain vertical position
- Establish the slipstream’s location (buffet)
- Move vertically, to just above, or below the slipstream.
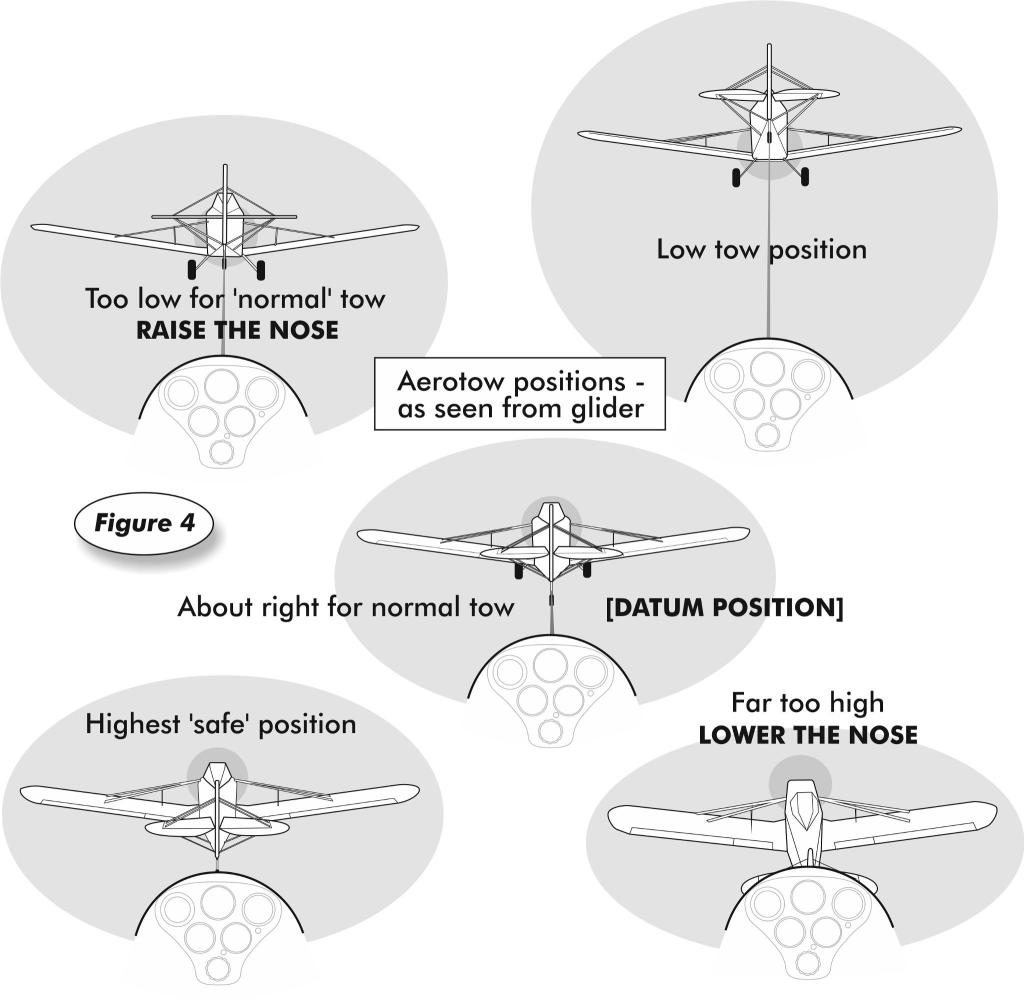
- Fix the tug’s position in the canopy as the attitude datum.
- Adjust elevator to keep the tug on the datum:
- If the Tug is High in the canopy, use Up elevator to place it on the datum.
- If the Tug is Low in the canopy, use Down elevator to place it on the datum.
- There is no need to aim higher or lower.
- The glider will home in on the desired position if the datum is held.
Low Tow Position
- Beneath the tug’s slipstream
- Rarely used in the UK
- Cross-country retrieves
- Dual tows
Normal (High) Tow Position
- Above the tug’s slipstream (just)
Lateral Positioning
Physics wants to keep the Tug and Glider in line
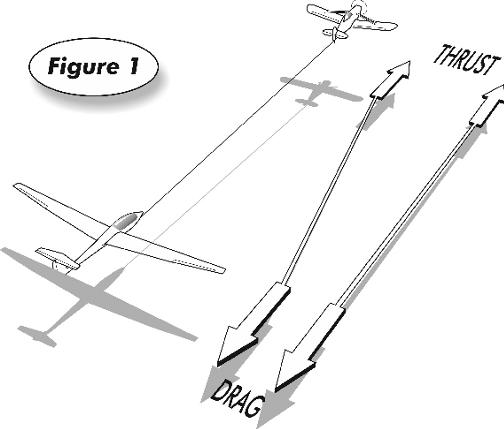
Gliders with a Nose Hook will tend to ‘follow’ more readily than those using a CG hook.
Positioning datum: the Tug’s wings (Angle of Bank)
Method to follow the Tug
Match the angle of bank to follow the tug.
Straight flight: glider is directly behind the tug, wings level.
Deviation: if the angle of bank is not matched, the glider will move off-line, in the direction of its ‘lower’ wing.
Correction: match the Tug’s angle of bank to keep the wings parallel to the tug. Allow the rope to pull you back in line.
Notes:
- In still air, corrections are minor.
- Aileron must always be coordinated with Rudder.
- Compared to normal flight, the Rudder will feel heavier and Adverse Yaw will be worse.
Divergent Oscillation
The result of over-correction:
- The tow rope exerts a strong centralising force.
- Over-correction therefore leads to over-shooting the desired position.
- Further over-correction makes things worse – potentially leading to a rope break.
When out of position, match the tug’s angle of bank and allow the glider to settle.
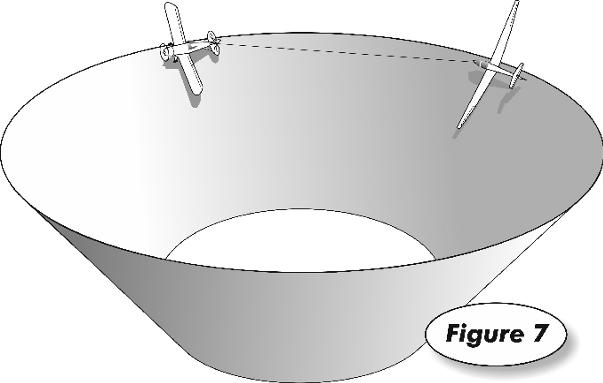
Boxing the Slipstream
- This exercise demonstrates a range of positions to which the glider may reasonably go.
- It will be performed at a later stage in your training.
- It typically involves:
- dropping below the slipstream
- moving half a wingspan laterally, and holding that position
- Climbing above the slipstream
- Moving back to the normal towing position.
Turning
During turns, the glider is not directly behind the tug
To fly the same path:
- The glider must point outside the turn (laterally).
If pointing at the tug:
- The glider will fall inside the turn,
- creating slack in the rope.
Method to maintain position in Turns
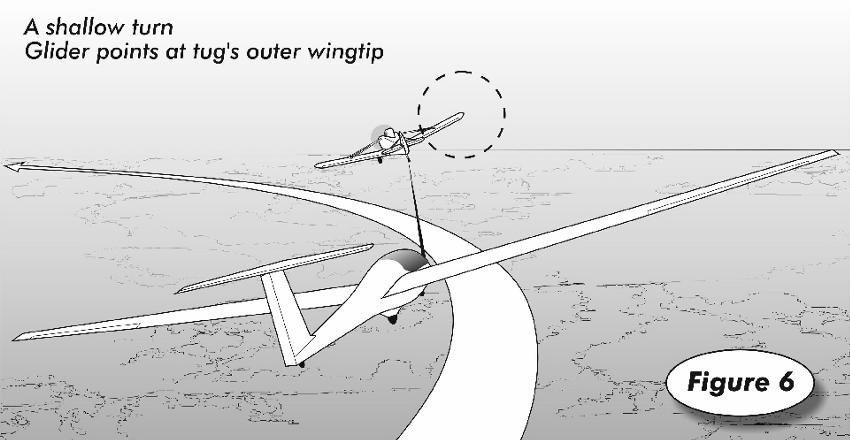
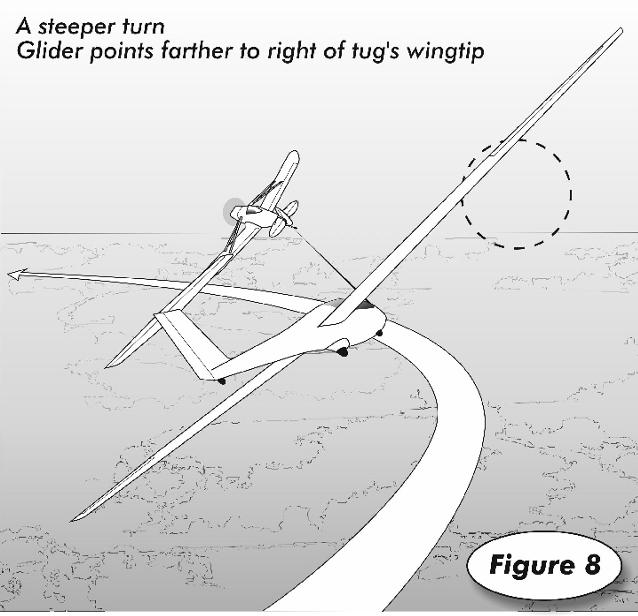
Match the angle of bank.
In shallow turns:
- The glider will be pointing at the tug’s outer wingtip.
In steeper turns:
- The glider will point further out.
Slack (Bows) in the Rope
Small bows:
- Will be taken out by the tug’s pull
- Do nothing… don’t make it worse!
Large bows:
- An experienced pilot may use minimal airbrakes or sideslip to remove the bow. This must be removed before the rope tightens.
- To release the cable in this situation:
- Wait for the rope to tighten
- Release just before it goes taught
- Releasing with a large bow is to be avoided: it can cause the rings to come back towards you, or wrap around the glider.
Releasing from Tow
- Confirm you are holding the (yellow) release control.
- If possible, confirm the location of the Airfield.
- Lookout
- Check the Tug
- Look for other gliders, hazards, clouds, before releasing the rope.
- Release the rope under tension:
- confirmed by it rippling away from you.
- Confirm it is clear to manoeuvre, and the rope has released:
- Raise the nose to maximise the separation
- Make a climbing turn in the opposite direction to the tug.
- Local rules may vary in terms of the direction.
- Monitor airspeed as the glider slows – avoid stalling.
- Confirm the location of the airfield – watch the tug.
- Configure for flight.
Descending on Tow
- May be necessary to avoid
- cloud
- airspace
- Cross country retrieve
- Inability to release
Low Tow position is less tiring and safer.
Use airbrakes to avoid climbing above the tug.
Emergency Signals
Tug
Tug Waggles Rudder
The glider has a problem
Check your Airbrakes (or braking parachute)
Tug Rocks Wings: The Emergency Wave Off
The tug (or combination) has a problem
Glider must Release Immediately
In rough air, watch the tug’s ailerons:
- Moving after a roll: responding to a gust
- Moving before a roll: signalling
Glider
The only problem the tug pilot wants to know about is if you can’t release…
- Try the Radio.
- Fly to the Left of the tug, and waggle your wings
- Forward enough to be visible
- Roll left first
- (Almost no right roll is required)
- May need some Airbrake to keep the rope taught.
- Beware airbrakes snatching open at towing speed.
The tug pilot will take you back to the airfield, then release the tow rope.
Ground Operations
Glider Positioning
Align with the tug’s intended direction of take-off
The tug often takes up position after the glider is in place
Pre-Flight Checks
- Glider lined up, with no obstacles ahead
- Cushion usage: Confor
- Pre-flight Checks: ABCDE, CBSIFTBEC
- Min and Max safe aerotow speeds
- Wind direction
- Cloud base
- Where to go? Tell the tug pilot
Establish Radio contact
Tug pilot may want your details for the log
Will need to know where you want to go
Set the Volume for the (noisy) tow
Know who is in control of the launch
Club procedures vary:
- Who is calling “Take up slack” and “All out”?
Position of controls
Read the glider’s Flight Manual
- Trim for Aerotow speed
- Flap setting as recommended
- Stick Fore / Aft / Neutral as recommended, to get the glider to balance on its mainwheel for the ground run. Typical recommendations:
- Glider sits on its nose: Stick Aft.
- Glider sits on its tail: Stick Neutral.
- Anticipate prop-wash
Once hooked on, your left hand stays on the cable release until you release from the tow.
Wing Drop
More common with aerotows than winch (but initially slower):
- Initial forward movement is slow
- Prop-wash
- Wing runner
- Water Ballast
Immediate Action: Release
Ground Run, Take-Off and Climb
Ground Run
- The objective is to follow in line with the tug:
- Independent use of
- Aileron: wings level
- Rudder: track along the ground
- Elevator: raising the nose / tail, to get the glider to balance on the mainwheel – allowing maximum acceleration.
- Flaps: as recommended
- Independent use of
- If you cannot keep the wings level, release.
- Stick position depends on the type of glider (nose/tail heavy).
- Lift-off just above stalling speed.
Factors Affecting the Ground Run
- Tug performance & Glider weight
- Wind direction (headwind or cross wind?)
- Wind variability
- Surface and condition
- Runway length
Crosswind considerations on the Ground Run
- Initially: Downwind rudder to prevent yaw
- Initially: Use the elevator to help maintain track while airspeed builds
Take-Off and Climb
- Lift-off just above stalling speed.
- Ease the stick back, very gently, if the glider does not lift-off.
- Maintain height of 6-10 feet: your vertical datum.
- Take extreme care not to climb any higher: this is critical for the tug pilot’s safety.
- If the climb is uncontrollable – release immediately.
- If you lose sight of the tug – release immediately.
Crosswind considerations after take-off
- yaw or bank to prevent drift while the tug is on the ground
- wings level, string central after the correction
- the glider will be crabbing over the ground
When the tug lifts off
- it may not climb much initially,
- it may accelerate and hence climb more quickly
- fly the glider to keep the tug at the desired datum
Wind Gradient
- Climbing into a wind gradient may initially increase your airspeed:
- More lift
- Control responsiveness
- Heavy rudder
Launch Failures
Ground Run:
- Know where you will pull off if not airborne.
Airborne:
- Options to land ahead from a low failure are often limited
- Do not turn back unless sufficient height has been gained
- Turning back low down is undesirable:
- Stall / Spin
- Downwind drift
- Downwind landing
- Identify the land ahead options before launching
- On the airfield
- In an overshoot area
- Beyond the airfield
- Consider a controlled crash:
- into a clear space
- fly onto the ground
- ground loop, at the slowest speed possible
- Retain the tow rope.
Tug Upsets
Tug upsets kill tug pilots.
Caused by the glider climbing too high: the Slingshot
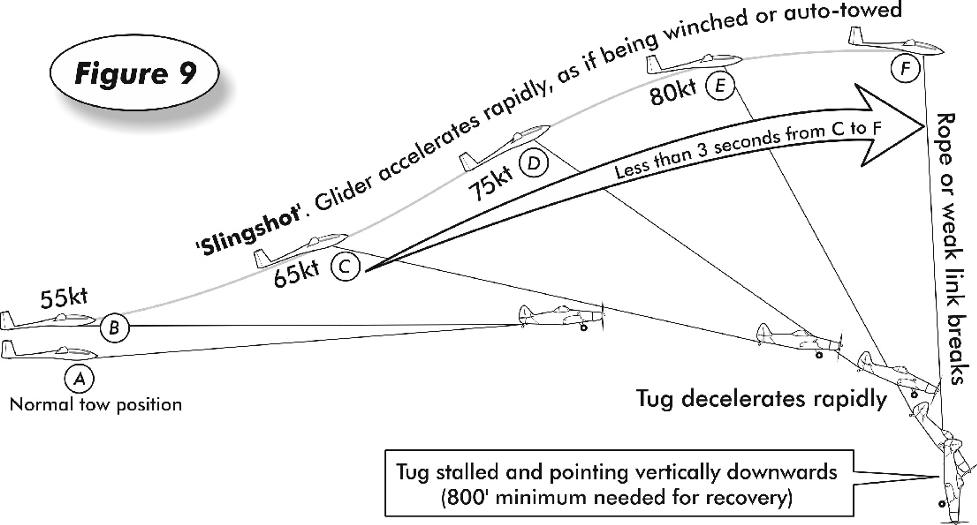
Keep your left hand on the release and your attention on the tug.
If you lose sight of the tug, Release
If getting high uncontrollably, Release
Risk Factors associated with Tug Upsets
- Light Pilot(s), close to minimum weight
- Inexperienced Pilot
- Belly or CG Hook
- All-flying tailplane (light elevator forces)
- Short Rope
- Significant Cross-wind component
- Turbulent conditions
- Rough Ground
- Light-weight glider, low wing loading
Recap
- How do you keep the tug pilot safe?
- How do you position the tug in your ‘sights’?
- What is the Emergency Release signal?
- What other signals are there?
- How do you hold your position?
- What factors do you consider before launching?
- What tasks are permissible during a launch / tow?
TEM (Aerotow)
TEM (Signals)
Threats
Real signals may be mistaken for practice.
Mitigation:
- Restrict practice to a safe height, where release would not be an issue.
Errors
Inadequate understanding between the tug pilot and instructor causes confusion.
Mitigation:
- Instructor must ensure that the tug pilot agrees with and understands what is planned.
Distraction.
Mitigation:
- Ensure good position keeping throughout.
TEM (Checks & Ground Operation)
Threats
Pilots used to winch launching may not consider aerotow issues.
Mitigation:
- Instructor carefully monitor the conduct of the checks.
Errors or omissions in the checks may result in taking off with an inadequately prepared glider.
Mitigation:
- Instructor carefully monitor the conduct of the checks.
Helpers & spectators may interrupt the checks.
Mitigation:
- Encourage third parties not to interrupt. When they do, be very careful the check has been correctly completed. If necessary, start again.
Errors
As instructor, after hearing the student pilot’s checks many times, it can be hard to remain attentive to their conduct.
Mitigation:
- Instructors should take sufficient breaks to maintain concentration.
Failure to allow for changing conditions.
Mitigation:
- Stay alert for changes, even on ‘benign’ days.
TEM (Take-Off)
Threats
Wing drop during the ground run.
Mitigation:
- Monitor angle of bank very closely & and release immediately if wings cannot be held level.
Ground Loop Risk Factors
- Long, Low wings
- Flapped Glider
- Cross-wind
- Prop-wash
- Wing Runner
Student pilot may mishandle the glider.
Mitigation:
- Instructor monitor closely at all times and take over early.
Launch failure at low level.
Mitigation:
- Plan to land ahead
- Turn Back only if safe to do so (height and speed)
Errors
Risk of Tug Upset
Mitigation:
- Under all circumstances maintain a safe height behind the tug.
Risk factors:
- Low experience of glider and/or tug pilot
- Gliders fitted with C of G hook only
- Glider’s C of G towards the aft limit
- Turbulent air in the take-off area
- Rough ground in the take-off area
- Significant cross-wind component
- Short rope
- Light-weight glider, low wing loading
- Loss of concentration and focus
TEM (On Tow)
Threats
The student pilot may mishandle the glider vertically or horizontally.
Mitigation:
- Instructor to monitor closely, take over early, especially below 1,000′ AGL.
Errors
Permitting the student pilot excessive latitude for position error
Mitigation:
- Under all circumstances maintain a safe height behind the tug.
TEM (Release)
Threats
The student pilot may raise the nose having failed to release.
Mitigation:
- Instructor to monitor closely, and be prepared to release.
Failure to lookout.
Mitigation:
- Ensure good lookout.
Errors
The student pilot may manoeuvre inappropriately after release, or fail to slow down.
Mitigation:
- Instructor be ready to take over immediately.
TEM (Out of Position & Recovery)
Threats
The student pilot may over control or mishandle the required corrections.
Mitigation:
- Instructor to monitor closely, take over in good time.
Errors
When placing the glider out of position, it can be overdone.
Mitigation:
- Be mindful of this possibility and take care.
TEM (Descending on Tow)
Threats
The student pilot may mishandle early attempts.
Mitigation:
- Instructor to demonstrate thoroughly and take over early.
Errors
Failing to deal with a slack rope.
Mitigation:
- Monitor carefully and use brakes in good time.
TEM (Launch Failure Exercise)
Threats
A real failure may occur in the course of the exercise.
Mitigation:
- Be alert to this possibility and retain margins.
Errors
Running out of height for an appropriate circuit.
Mitigation:
- Monitor height and position.
TEM (Tug Upset)
Risk Factors
- Low experience of glider and/or tug pilot
- Gliders fitted with C of G hook only
- Glider’s C of G towards the aft limit
- Turbulent air in the take-off area
- Rough ground in the take-off area
- Significant cross-wind component
- Short rope
- Light-weight glider, low wing loading
- Loss of concentration and focus
Mitigation
- Instructor to monitor student pilot’s action and glider positioning throughout, and take over early.
- Focus on the launch and exercise, and avoid being distracted.
- If you cannot see the tug (or sense you will become excessively out of position), release immediately.
Flight Exercises
Prerequisite: the Student Pilot must be able to fly reasonably straight and manage coordinated turns to benefit from aerotow lessons. It is essential that they can detect and correct even minor deviations from ‘wings level’.
Safety Reminder: Protect the Tug Pilot. Student Pilots must be briefed on Safe Aerotowing before taking control. Initial training should occur at a height that allows the tug pilot to recover in the event of a serious error – above 1,000′.
Signals or Communication before and during launch
- Ground signals – brief the Student on local practices.
- Tug signals – brief the Tug Pilot (after the Student has the basics):
- Wave Off: at launch height.
- Rudder Waggle: Student check airbrakes.
- Glider signals – brief the Tug pilot, and brief the Student on the actions to be taken prior to signalling.
- Can’t Release.
Pre-Take-Off Checks and Ground Operation
Brief Student on local procedures and items specific to the glider (and perhaps the tug too). Include:
- Point of launch abandonment if not airborne.
- Rope break / launch failure considerations.
Take-Off Into Wind and Cross Wind
Prerequisite: Student is able to maintain position correctly (previously demonstrated at a safe height).
Initially demonstration only.
- Glider pointing in the direction of take-off.
- Radio contact made with tug.
- Pre-launch checks, stick positioned, accept the rope.
- Left hand remains on yellow knob until released.
- Lookout: clear ahead, no conflicting traffic.
- Note tug’s position in the canopy at ‘All Out’.
- Keep wings level on ground run, using ailerons, initially with large inputs.
- Use rudder to steer (uncoordinated controls on the ground; use of downwind rudder in a cross wind).
- Balance glider on the mainwheel, using elevator.
- When airborne, use coordinated controls.
- Hold the glider in level attitude:
- No higher than the tug’s fin, as it continues its ground run.
- Maintain the tug in ‘gunsight’ position as speed builds (which may require a change of pressure on the stick, depending on the trim).
- Monitor launch failure landing options until safe to turn back.
The Aerotow On Tow: Straight Flight, Turning and Slip Stream
- Normal Position
- Demonstrate the reference position of the tug in the canopy (e.g. when the rope tightens at the start of the ground run).
- Vertical Positioning Behind the Tug.
- Locate the tug’s slipstream, and rise just above it. Establish the tug’s position as the attitude datum.
- Control the attitude datum with the elevator (keeping the tug on it’s datum).
- Demonstrate the visualisation of tug rising and descending against its datum, and your corrective action.
- Demonstrate the Low Tow position, and recovery to the normal tow position.
- Demonstrate the Highest Safe Position, and recovery to the normal tow position.
- Lateral Positioning Behind the Tug.
- Demonstrate that in straight flight the glider’s angle of bank matches the tug’s. Wings are parallel.
- Demonstrate that when the wings are not parallel, the glider diverges from the tug.
- Recover position laterally by matching the angle of bank.
- Demonstrate recovery from divergent oscillation.
- Student Attempts:
- Initially above 1,000′ AGL.
- The Student will require practise using all of the basic techniques together.
- Take over early and allow the Student to have breaks.
Releasing
- Demonstrate the release.
- Student releases – initially as briefed.
- Student takes a greater role in the release decision making and process.
Out of Position on Tow and Recovery
Brief the normal process for recovery:
- Glider wings parallel to the tug’s.
- Adjust the vertical position.
- Adjust the lateral position.
Exercises:
- Demonstrate the recovery from being out of position.
- Student attempts:
- Single axis displacement.
- Two axis displacement.
- Two axis displacement with movement.
Descending on Tow
Lesson at the late stages of aerotow training. Demonstration essential.
- Brief the Tug Pilot: height at which to commence, finish and any repetition(s). Use radio calls to initiate and end the exercise. Aim to do so within 200′ of descent.
- Demonstrate:
- Approaching the agreed height, note the normal rate of climb.
- Student follow through.
- As the combination slows, note the decrease in the rate of climb, the tug’s new ‘normal’ position rising in the canopy, and the rope becomes slacker.
- Note the glider’s slightly nose-up attitude.
- This is the time to open the airbrakes slightly, to maintain a tight rope.
- The ‘normal tow position’ is now higher.
- Radio call: “Exercise complete”.
- When the tug reapplies power, note the change in the rate of descent/climb: smoothly close (and lock) the airbrakes and resume the normal tow position.
- Student attempts Beware!:
- At a safe height, sufficient for the tug to recover from an upset.
- Instructor guard controls against over-controlling vertically.
BGA’s Safe Aerotowing Advice
