Introduction
Aim: You will understand fully how the controls work, all their effects, and how to use them.
What do we know?
What can you tell me about using the ailerons, elevator and rudder?
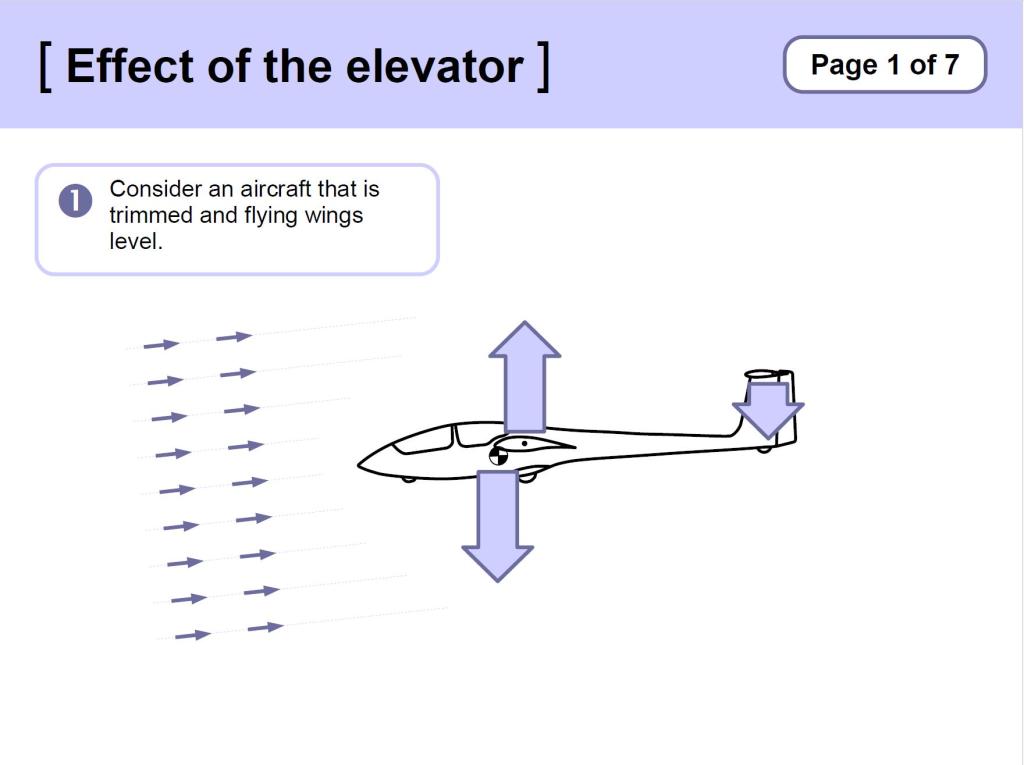
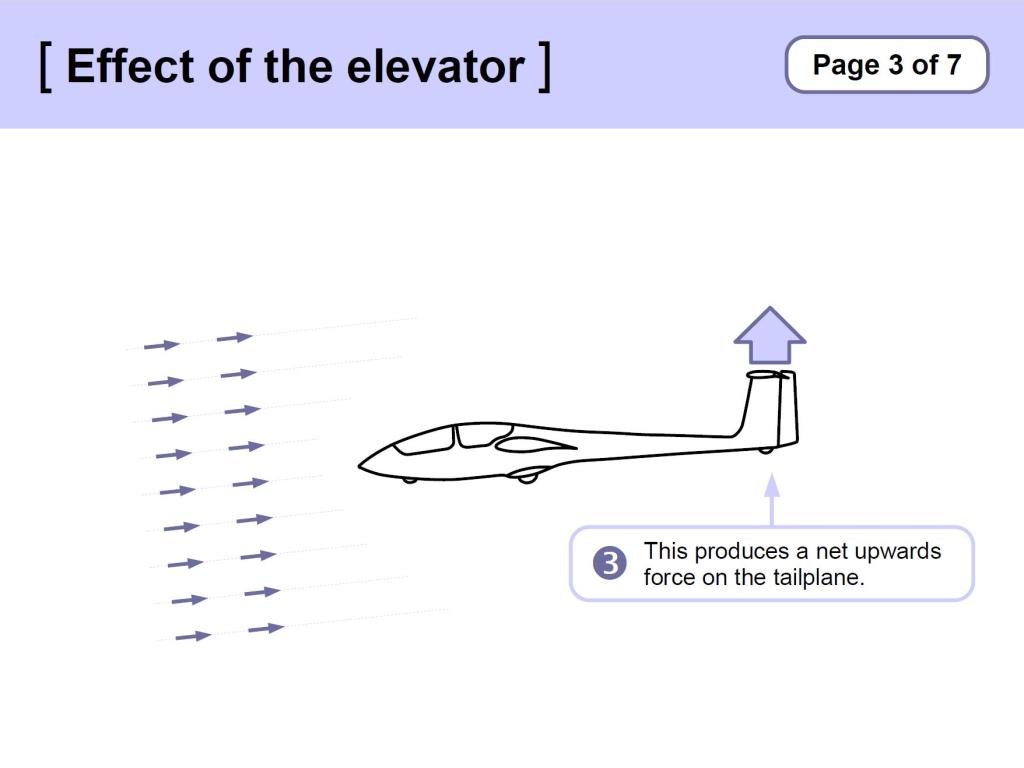
Elevator
Pitch → Attitude → Speed
Controlled by the Stick
Direction of control movement
- Stick Forward: Nose goes down
- Stick Back: Nose comes up
How the elevator works


Amount of control movement
- The elevator is the most sensitive of the controls: small movements.
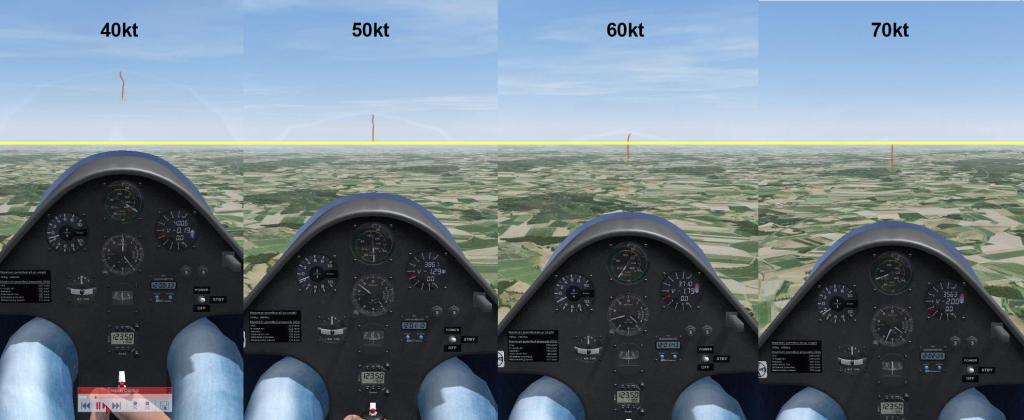
Visual Reference
- The Horizon, or the Amount of Ground in View
Video: Effect of Elevator
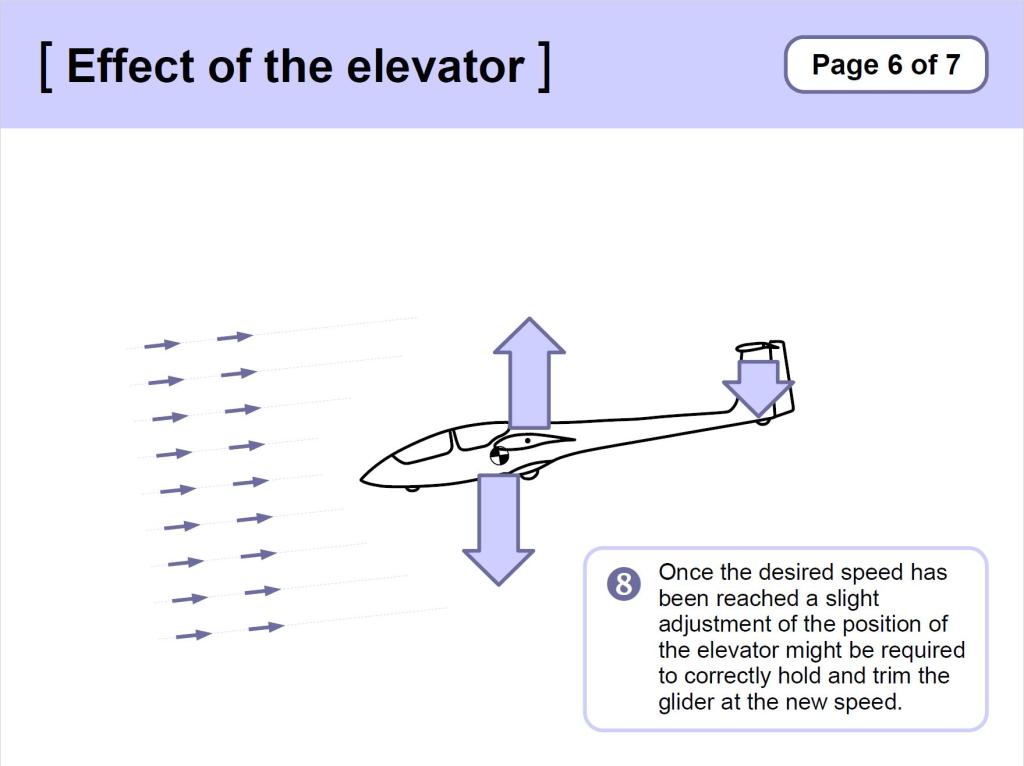
Changing to a different Speed
- Change attitude as appropriate for the desired speed (a guess).
- Hold the attitude, wait for speed to settle, then adjust.
- Equilibrium means speed is slow to change: Wait:

- As the stick is moved forward and the glider pitches down,
- it will settle in an attitude that generates more speed,
- creating more lift,
- causing the glider to pitch up,
- requiring a bigger push forward on the stick to maintain the attitude.
- Use the Trimmer to remove the stick load, after the speed has settled.
‘Chasing the Needle’ is ineffective
- If you keep moving the stick until the desired speed is achieved, the glider will continue to change speed beyond your target.
- You will then have to move the stick the other way, and will ‘overshoot’ once more.
- Move, Wait, Adjust.
Video: Attitude determines Speed
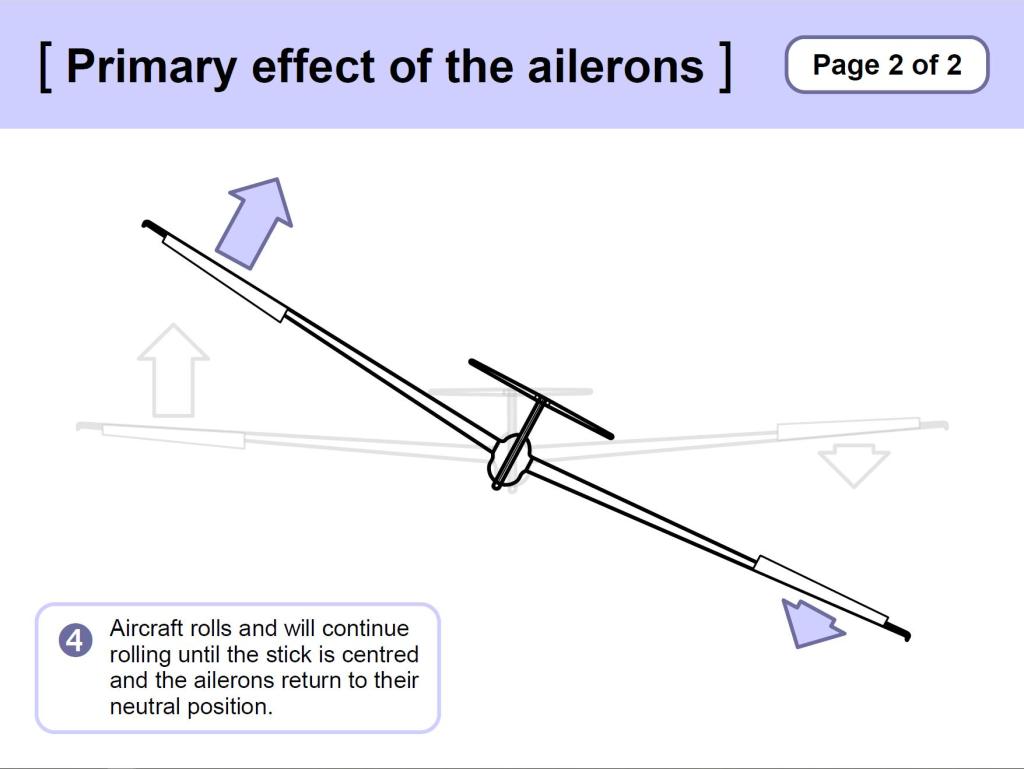
Ailerons
Bank → Roll
Controlled by the Stick
Direction of control movement
- Stick to the Left: glider rolls Left
- Stick to the Right: glider rolls Right
How the ailerons work
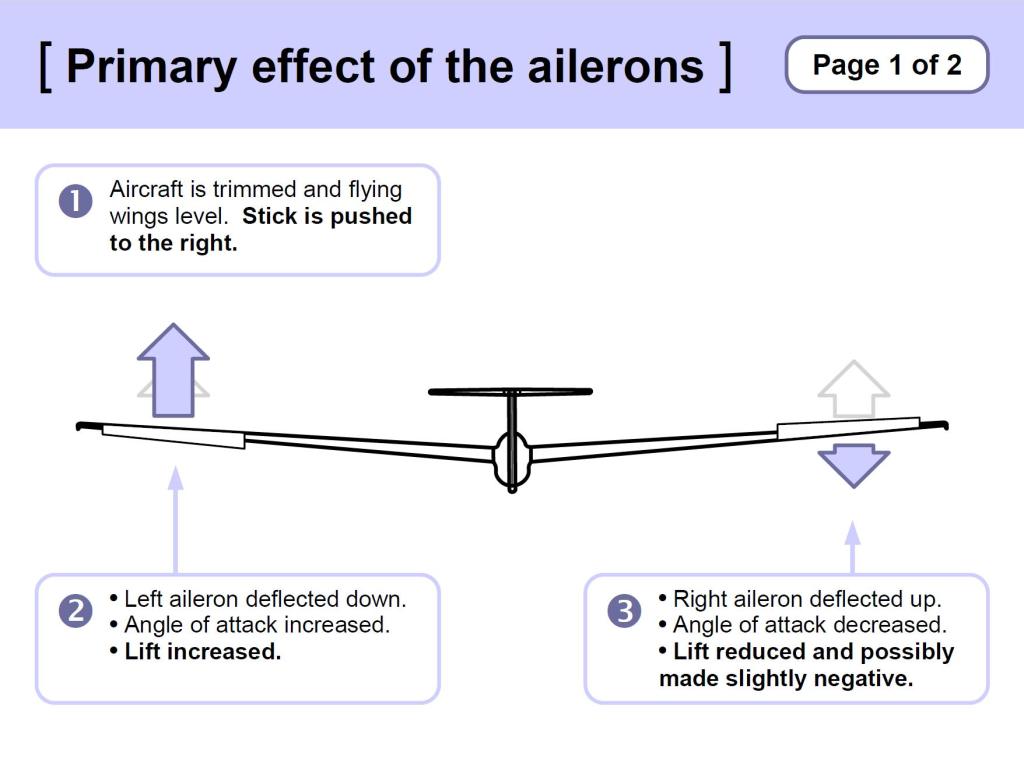
Amount of control movement
- Proportional use
- Continuous effect
- Initially use ‘measured inputs’
Visual Reference
- The Horizon
- Symmetical either side of the cockpit edges is ‘wings level’
- Non-symmetrical is ‘banked’
Holding an angle of Bank
- Normally the stick is held slightly beyond the ‘ailerons neutral’ position – i.e. slightly towards the outer (raised) wing.
- This is to counteract the effect of the outer wing travelling faster than the inner wing.
The need for Back Pressure

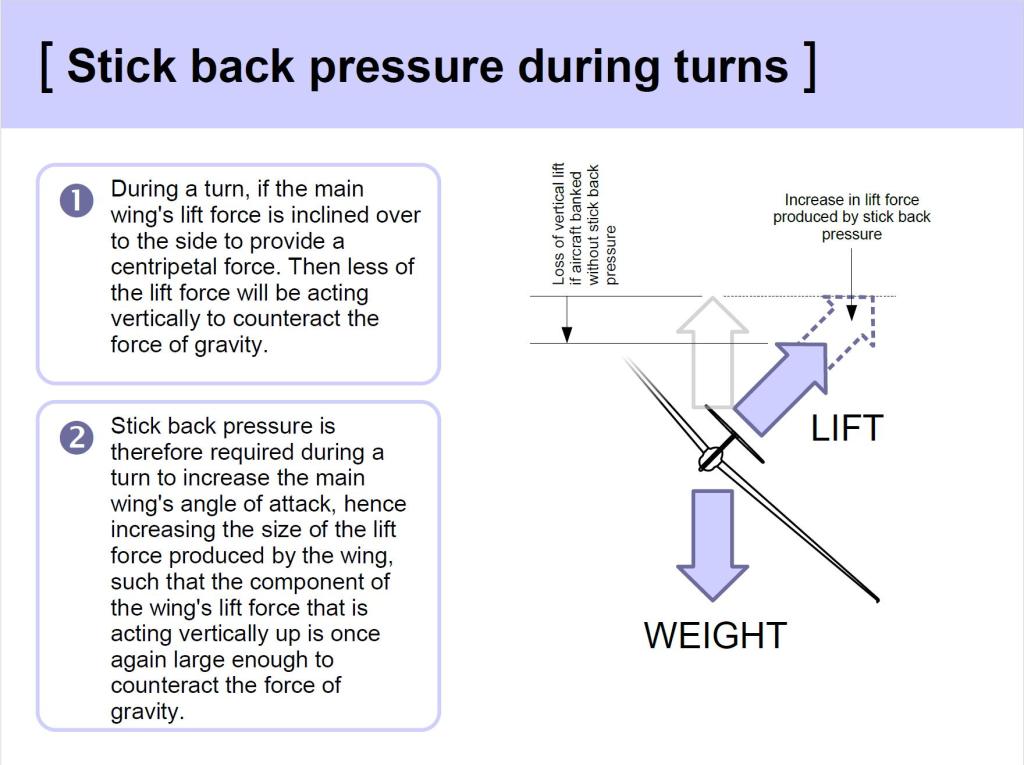
- As the glider banks, the Lift is inclined into the turn.
- Hence there is less Lift acting vertically to support the Weight.
- Generate more lift by using the elevator (to increase the Angle of Attack). Note the stick’s fore & aft position differences in the illustration above (Wings level / banked). See also the briefing on Turning for more detail.
Rolling Wings Level
Simply the reverse of rolling in to the turn:
- Coordinated use of Aileron and Rudder to:
- initiate the roll to level
- control the rate and amount of roll
- and to keep the string central
- As the wings come level:
- Centralise the stick and rudder
- Ease the back pressure on the stick
Video: Effect of Ailerons
Rudder
YAW – not Turn
What is Yaw?
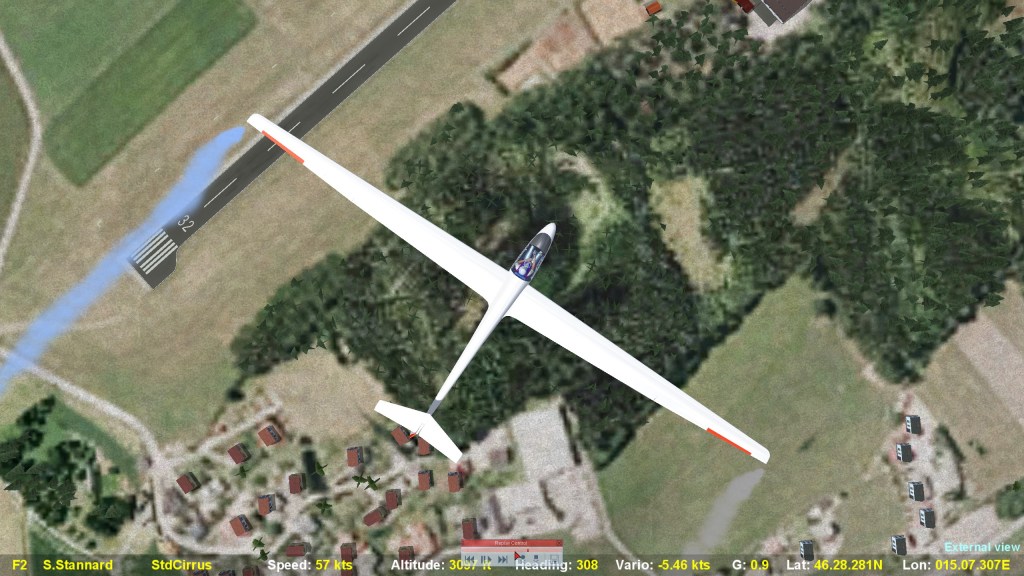
In this image, the glider is:
- pointing towards the runway, but
- moving sideways, parallel to it (indicated by the smoke trail).
- The glider is yawed to the left.
Controlled by the Rudder Pedals
Direction of control movement
- Press the Left rudder pedal to yaw left
- Press the Right rudder pedal to yaw right
- Note: allow the other pedal to move towards you.
How the rudder works
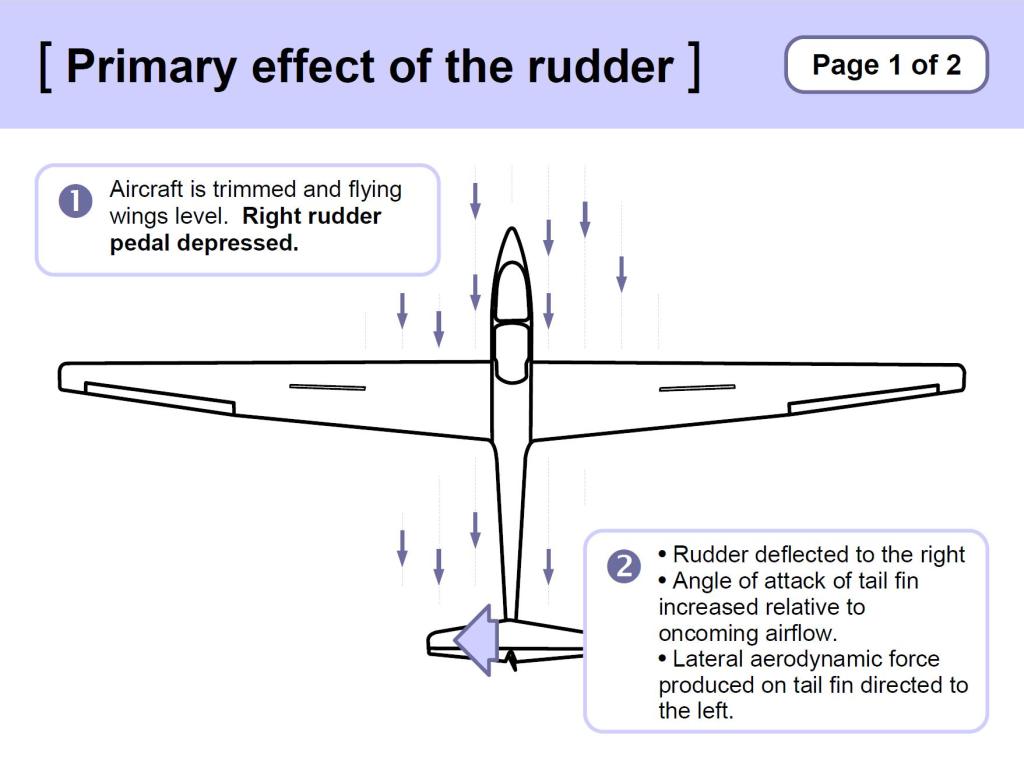
The tail fin assembly is like a vertical wing. Deflecting the rudder:
- changes the angle of attack of the tail fin,
- generates ‘Lift’, acting sideways,
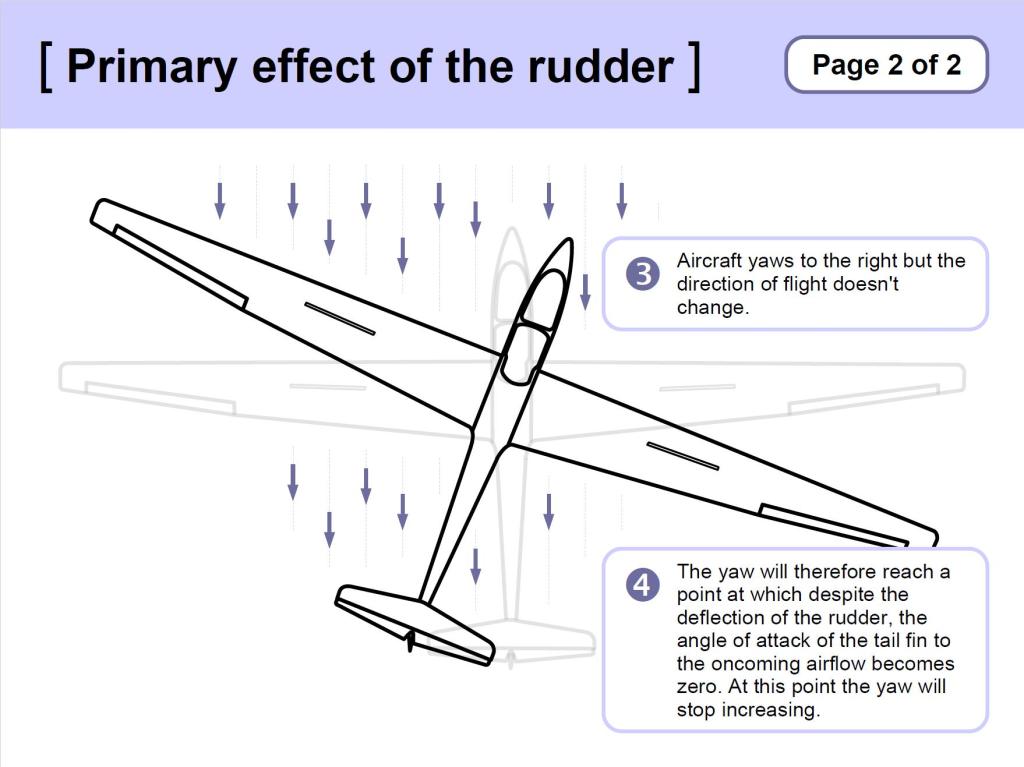
- This sideways pressure generated by the rudder is limited in amount. It can only overcome a certain amount of the airstream’s pressure against the fuselage and fin – hence the yaw effect is limited.
Amount of rudder pedal movement
- Proportional use
- The amount of yaw attainable is limited
- Self-centring
- The heaviest of the controls
Visual References
- The String
Video: Yaw
Purpose of the Rudder – Is to control Yaw. Its use will be revealed in a moment. First, we need to understand the secondary effect of the aileron.
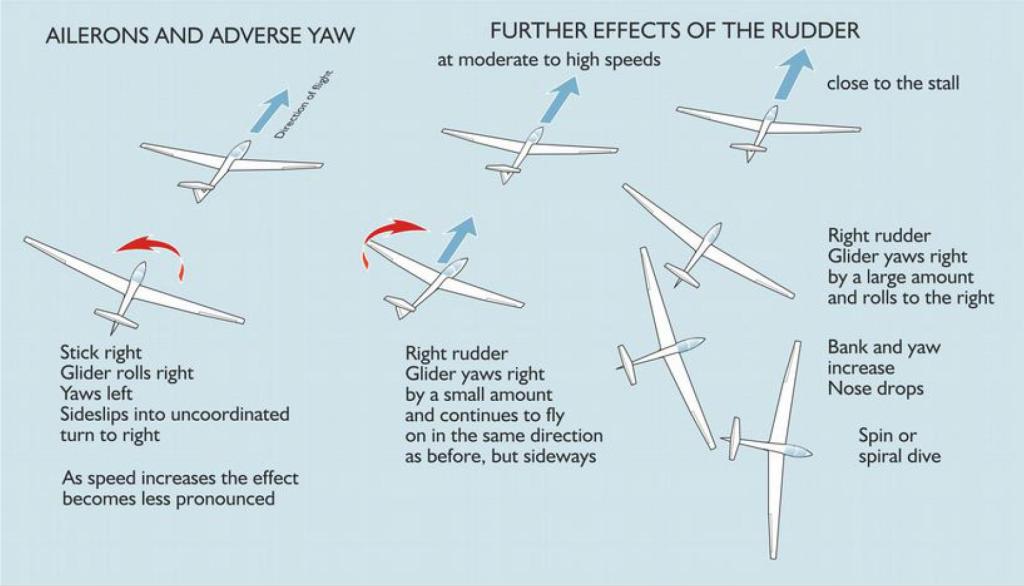
Secondary Effect of Ailerons
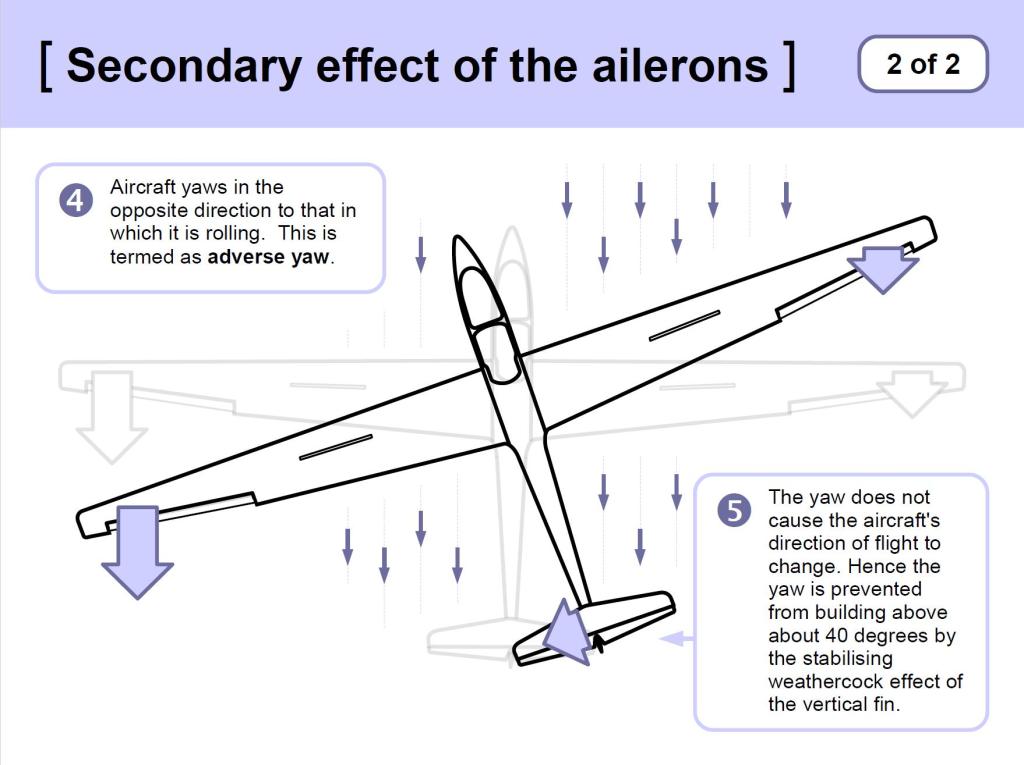
The Secondary Effect of Ailerons is Adverse Yaw:
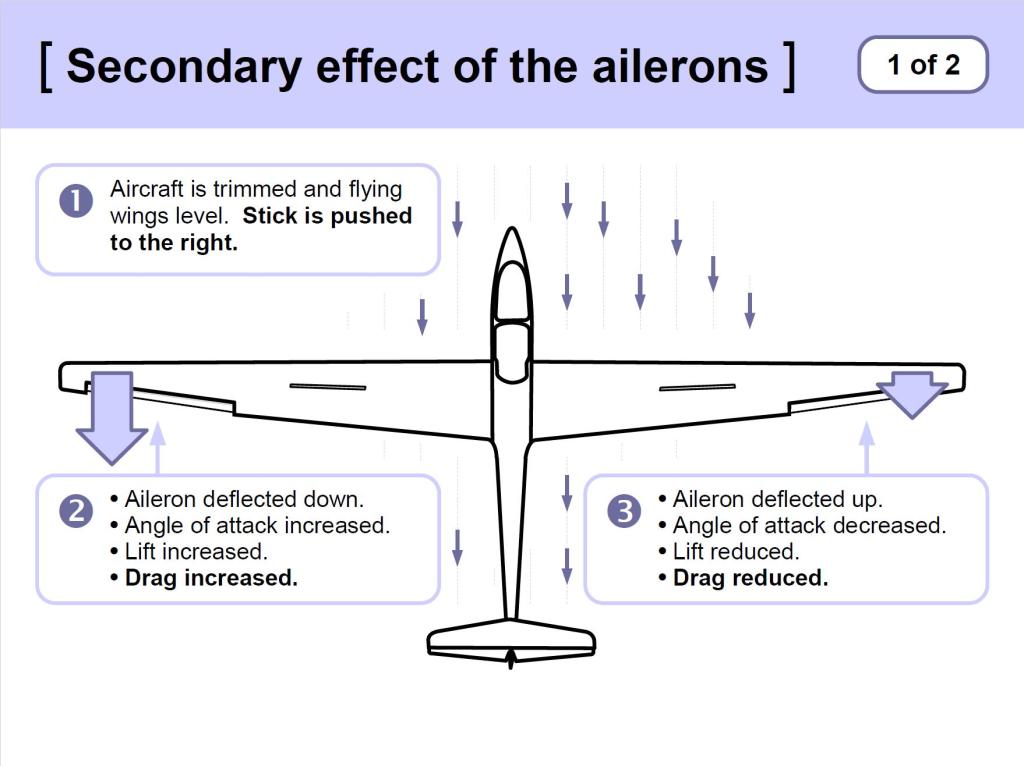
- Whilst rolling, the up-going wing is generating more lift, and the down-going wing less lift.
- More lift → more drag (Aileron Drag)
- Less lift → less drag
- This differential drag acting on the wings creates Adverse Yaw
- The solution to Adverse Yaw is to use Aileron and Rudder together:
- e.g. Left Aileron with Left Rudder
- Similar amounts, or pressures
- The amount can be judged by keeping the string central.
- This is referred to as “the Coordinated Use of Aileron and Rudder”
Video: Secondary Effect of Ailerons
Secondary Effect of Rudder
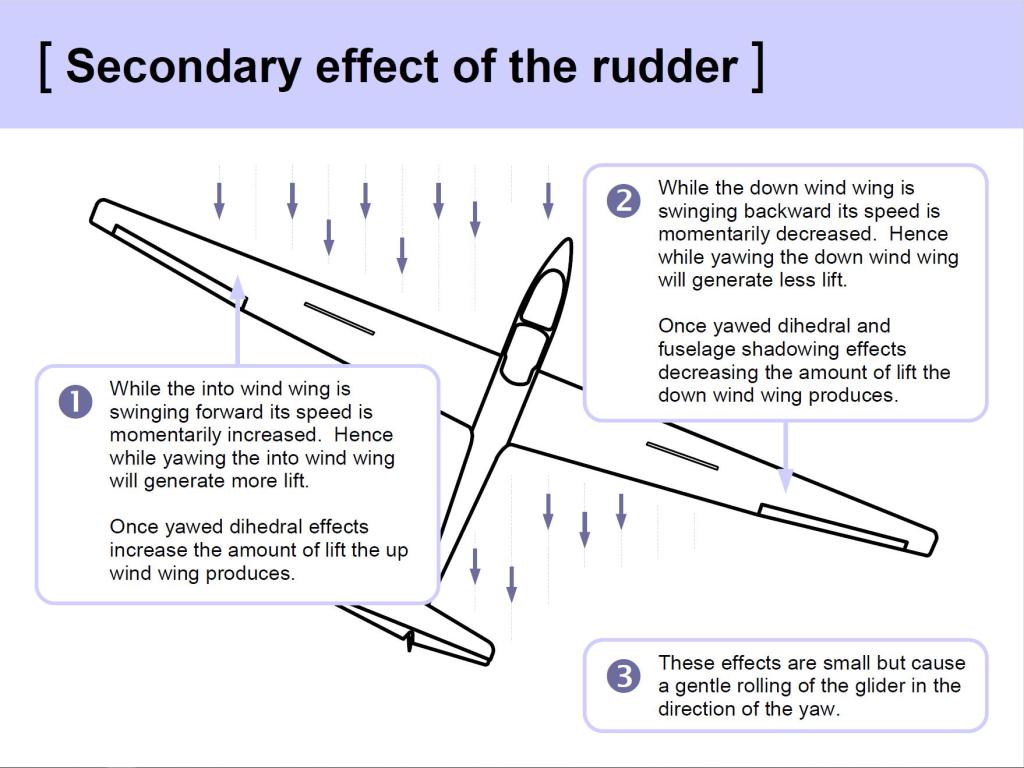
Whilst yawing and yawed, the forward going wing generates more lift, and the back-going wing generates less lift, causing Roll in the same direction.
Secondary Effect of Rudder when close to the stall
The secondary effect is much more pronounced when close to the stall:
- At cruise speeds, after several seconds:
- Yaw: 30 degrees
- Roll: 10 degrees
- Close to the stall, very quickly:
- Yaw: 15 degrees
- Roll: 70 degrees.
Over-ruddering at very low speeds can initiate a Spin
Video: Secondary effect of Rudder
Summary
Fly by Attitude
The instruments confirm what we are seeing.
Recap
- How is speed controlled?
- How far should we move the stick when controlling the elevator?
- How do we judge the attitude when aiming for a target speed?
- How do we roll the glider?
- How do we stop the angle of bank increasing?
- When rolling, what else do we need to do?
- Why would we yaw the glider?
- How?
- Which instrument(s) do we use to control yaw?
Self-briefings
There is a multitude of self-briefings addressing Effects of Controls, Secondary Effects, Coordinated Rolling, Airspeed Monitoring and Use of the Trimmer, published in the Students area, at this link, each with their own text, images and demonstration video.
TEM
Threats
Distraction, Focus inside the cockpit, Collision
Mitigation:
- Lookout frequently (head out of the cockpit, fly by attitude).
Errors
Running out of height for an appropriate circuit.
Mitigation:
- Monitor height and position.
Flight Exercises: Effects of Controls
This is likely to be the Student Pilot’s first flight in which they take control of, and fly, the glider. Hence it is important to stress the need for lookout, and to ensure the student is prepared.
- Recap holding the stick, lightly, in the right hand, and how to ‘follow through’.
- Recap taking & passing control.
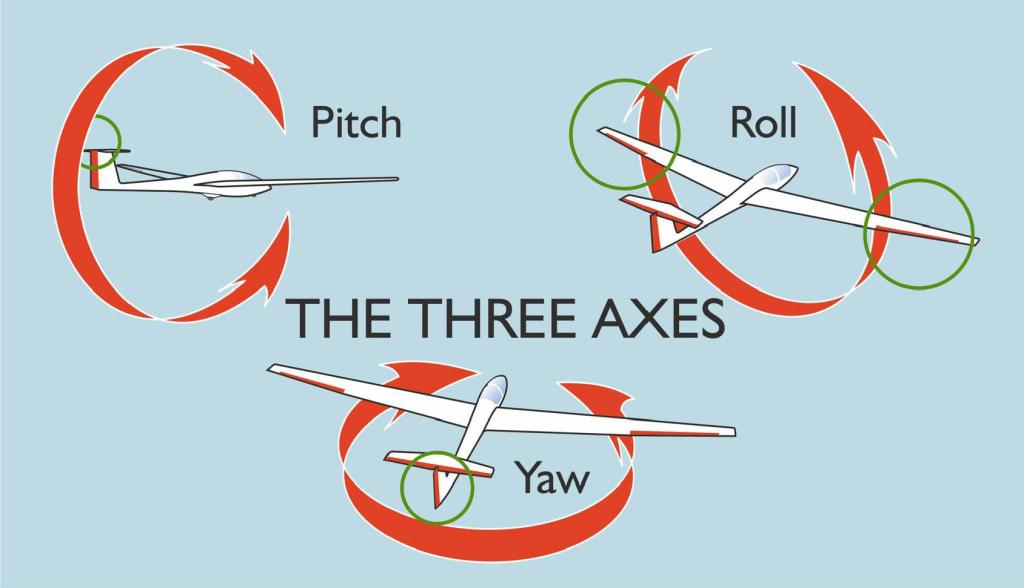
- Recap pitch, roll and yaw, and which controls affect them.
- Ensure the student is strapped in, comfortable, and can operate the controls.
- Brief them on the instruments, minimally the ASI.
Primary Effect of Controls: Elevator
- Student follows through.
- Establish the glider in the normal gliding attitude, trimmed.
- Ask student to note the position of the horizon. Tell them this is the normal gliding attitude.
- Lower the nose and point out the change in attitude and speed.
- Return to the normal gliding attitude, noting the speed returns to its previous value.
- Student attempts.
Primary Effect of Controls: Ailerons
- Student follows through.
- Establish the glider in the normal gliding attitude, trimmed.
- Establish the visual references with wings level – symmetrical horizon.
- Demonstrate how the visual references change when the wings are not level.
- Lookout.
- Demonstrate use of stick to roll, holding angle of bank, application of back pressure, and glider continues to turn when banked.
- Lookout.
- Demonstrate return to wings level.
- Student attempts, instructor operates rudder to prevent adverse yaw.
Primary Effect of Controls: Rudder
- Demonstration only.
- Fly into wind, or down wind, ideally towards a landmark, or along a line feature.
- Ask student to note a landmark over the nose.
- Student follows through lightly on rudder.
- Demonstrate effect of rudder, wings level: yaw, glider pointing to one side while continuing to travel in the original direction.
- Centralise rudder, pointing the glider in the original direction.
Flight Exercises: Coordinated Rolling
Culminating in coordinated rolls, these exercises also demonstrate the secondary effects of aileron and rudder, and continue the emphasis on lookout.
Secondary Effect of Ailerons
- Lookout.
- Student pilot looks over nose, while instructor rolls without using rudder. Student observes adverse yaw.
Coordinated Rolls
- Lookout.
- Demonstrate coordinated rolls, without adverse yaw.
- Punchline: “Coordinated flight is achieved by using stick and rudder together.”
- Student attempts.
Secondary Effect of Rudder
- Lookout.
- Student pilot looks over nose, while instructor applies rudder without using ailerons. Students observes induced roll.
Rolling about a Heading
- Lookout.
- Demonstrate that coordinated use of the controls eliminates their secondary effects.
- Student identifies a point ahead, and follows through, looking ahead.
- Stick & Rudder together, quickly, roll around the heading. Student observes that the nose does not swing.
- Demonstrate uncoordinated use. Student observes the nose swings.
- Repeat demo of coordinated use of controls to roll.
- Student attempts coordinated use of controls.
Recover to straight flight from moderate bank angles
- Lookout.
- Student follows through.
- Patter recovery from moderate bank, repeating in both directions.
