Introduction
Aim: You will:
- recognise when spins can occur
- recognise a spin’s characteristics
- learn and apply the correct recovery action with the minimum loss of height
- avoid inadvertent spins by developing safe flying habits
- recognise the difference between the spin and spiral dive, and apply the correct recovery action
What do we know?
So, you can see a lot of green, not much blue, and the world is going round…

- How might a glider get into a spin or spiral dive?
- Why are we bothered?
- What would you do?
A little Theory
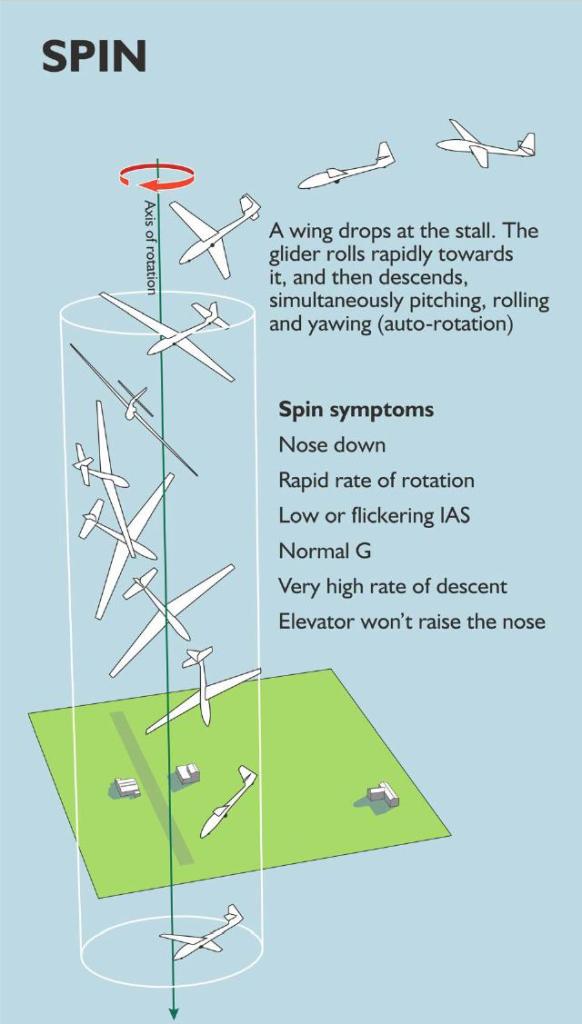
What is a Spin?
- A spin is “a stall with autorotation“
- The autorotation can be in all three axis
- “Autorotation” indicates a steady state
How do Spins occur (in gliding)?
A Spin develops from a Stall with Yaw. Autorotation follows.
- A wing will stall, then drop, and hence become more stalled, with more drag, increasing the yaw.
- The upgoing wing will have decreasing drag.
- The rotation accelerates, leading to autorotation.
The most common situations where they occur
- Over-Ruddered Turn
- Final Turn
- Thermal Turn
- Turn in a Winch Launch Fail Recovery
- Misuse of ailerons
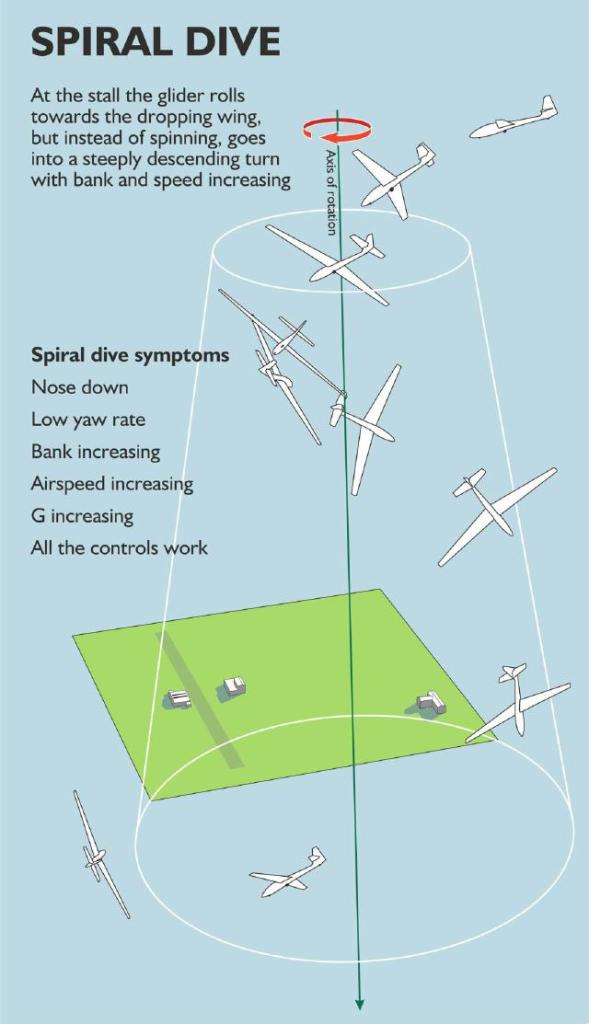
What is a Spiral Dive?
A spiral dive is “a steeply descending turn”
A spiral dive can result from:
- allowing the nose to drop when entering a turn
- a partially recovered spin, when the glider unstalls
Why differentiate?
Recovery actions differ
Recognition
Spin
Spiral Dive
Recovery
Spin
Spin Recovery:
- Establish Direction of Rotation.
- Full Opposite Rudder
- Centralise Ailerons
- Ease Stick progressively forwards, until the rotation stops.
- Centralise Rudder when the rotation stops.
- Ease out of dive, to normal attitude
Rudder: why fully opposite?
- That is the design criteria!
- Reduces Yaw
- Helps to pitch the nose down.
- Airflow at speed will make this feel (very) heavy.
Stick: why centrally?
To remove differential drag from the ailerons
Stick: why ease?
- To avoid a steep dive.
- Minimise height loss.
Stick: why forward?
To unstall the wings.
Spiral Dive
Spiral Dive Recovery:
- Level the wings with a coordinated roll
- Ease out of the dive
The importance of knowing the difference
- Recovery differs
- One won’t work in the wrong situation
- The other is dangerous if used incorrectly
Speed may build rapidly during a spiral dive
- Max Manoeuvring Speed is easily exceeded
- Take recovery action immediately
- Take care with control usage:
- One control at a time,
- used cautiously…
- One control may be used up to full deflection, on its own – usually the elevator.
Use of Airbrakes
Do not use the Airbrakes:
- Opening the airbrakes will reduce the acceptable loads:
- From 5.3G to 3.5G
- Weakening the wings in the centre section
- Accept the G and pull hard, without exceeding the range of control usage permitted
Play, then press [f] to view in Full Screen
Prevention
Always keep the String central – especially when turning.
The Scan Cycle: Lookout, Attitude, Instruments (String).
Factors that may encourage a spin
Aside from those which will initiate a stall (such as contamination, or gusts, etc), some are implicated in the occurrence of spins:
Centre of Gravity
- A rearwards CoG increases the tendency to spin, and makes recovery harder.
- Light pilots: read the placard – use ballast.
- May be glider-specific: Refer to the Flight Manual.
- BGA advice is for early solo pilots, and pilots new to type:
- to fly at least 15Kg above the placarded minimum weight.
Pilot Error
- Distraction
- e.g. A busy thermal
- Inattention
- e.g. Looking elsewhere instead of over the nose during the final turn.
Flaps
- Flaps change the stall speed.
- Spin characteristics may be affected: Read the Flight Manual
- Neutral setting is probably required for recovery, and to avoid a subsequent stall!
Further Spinning
An exploration of circumstances in which spins occur
Changing effect of Rudder at the Stall
- The secondary effect of rudder is more pronounced near the stall:
- causing a sudden wing drop.
Steep, or Thermal Turn
- The glider will spin well above the normal stall speed (for the angle of bank) if the controls are not coordinated e.g.:
- Steeply banked – perhaps when working a tight thermal,
- Excess rudder,
- Excess elevator to hold the nose up – which may be happening as a result of pulling up into a thermal from a high speed inter-thermal cruise.
In a normal Approach Attitude, following a winch launch failure
- During the recovery push-over, the glider will briefly be in the Approach Attitude. If the glider is held in this attitude, rather than continuing to a more nose-down attitude, it will be:
- at less than 1G, and
- below the normal flying speed.
- It may be flying like this at that moment, but… 1G will return.
If in this configuration:
- the stick is held back (to return to the normal attitude), the glider will mush stall.
- a turn is commenced, a wing will drop and the glider is likely to spin.
Spin to the opposite direction of the intended turn
e.g. Spin Left off a Right Turn
- If a wing drops during a turn, and Full Opposite Rudder is applied before a spin develops, it may cause a Spin in the opposite direction.
Recap
- Which gliders can spin?
- How does a glider spin?
- How do you recognise a spin?
- How do you recognise a spiral dive?
- What is the recovery technique for a spin?
- How do you prevent a spin?
TEM (Spins & Spiral Dives)
Threats
Student Pilot adverse reaction
Mitigation:
- Instructor prepare and brief student appropriately & monitor them carefully.
Student Pilot fails to, or overreacts, at recovery
Mitigation:
- Instructor monitor & take over promptly.
Collision
Mitigation:
- HASSLL checks: (Height (set minimum to start and finish), Airframe (Max Manoeuvring Speed), Security, Straps, Location, Lookout).
- Maintain Lookout throughout the exercise.
Errors
Running out of height for an appropriate circuit.
Mitigation:
- Monitor height and position.
Allowing a spin to continue at an inappropriate height.
Mitigation:
- Be prepared to recover before safe margins are eroded.
- Be prepared to bale out (in the extreme situation).
Flight Exercises (Recognition and Avoidance of Spins and Spiral Dives)
Summaries of the exercises to be flown:
Recovery from a steep dive (akin to a spin or steep spiral dive recovery)
It is recommended that the student pilot be taught to recover from a high speed dive, similar to the post-spin attitude and speed, without over-speeding, before starting the spin entry and recovery exercises. This better prepares them to make a safe recovery after their early experiences of spinning, and avoids compounding two potentially scary lessons into one.
Spiral Dive, Recognition and Recovery
Spiral dives tend to happen by accident during a student’s training – take these opportunities to teach recognition and recovery. Otherwise, initiate a spiral dive by not pulling the stick fully back at the point of spin departure.
Spiral Dive recognition: increasing speed, increasing G, lower rate of rotation.
Spiral Dive recovery: level the wings (coordinated controls), ease out of the dive (wings level).
Spin Recognition
Once familiar with the recovery from a high speed dive, teach the student how to recognise a spin. Early experiences should be little more than a stall with a wing drop, in the order of a half-turn spin.
Spin recognition: Note the symptoms of a spin: low or flickering ASI, high rate of sink, high rate of rotation, normal G, stick fully back but not raising the nose.
Recovery from a Spin
Standard Spin Recovery: Centralise ailerons, full opposite rudder, stick progressively forward until the spinning (rotation) stops, centralise the rudder, recover from the dive.
Recognition and Avoidance of spins:
Spin from an Under-Banked Over-Ruddered Turn
- Describe a scenario in which this may occur, such as stretching the glide back to the airfield, before making a low, slow final turn.
- HASSELL
- Raise the nose slightly, entering slow flight to stretch the glide.
- Note the altimeter reading, to later measure the height loss.
- Enter a “final” turn at a shallow angle of bank (being “cautious” due to low height).
- Note the glider “isn’t turning quickly enough”, so rudder it round… which appears to work.
- Prevent the consequent increased rate of roll by applying opposite aileron…
- Prevent the consequent nose drop by applying up elevator…
- With the stick fully back, note the glider is spinning.
- Remind the student of the symptoms of a spin, to confirm its recognition.
- Recover: Standard Spin Recovery.
- Note the altimeter reading and determine the height loss (ideally at the lowest point of the dive, to make the point!).
Changing Effect of Rudder at the Stall
This reminds the student pilot of the primary and secondary effects of rudder, initially at cruising speed, and then close to the stall. At slow speeds, the effects will be different, and dangerous. It is a lesson in spin prevention.
- HASSELL
- Fly at the normal flying speed.
- Apply full rudder, and wait 2-3 seconds.
- Ask the student to note how much yaw & roll resulted.
- Recover, and slow to just above the stall (perhaps on the buffet).
- Apply full rudder. A wing drop is highly likely. Recover from the stall (stick centrally forward).
- Note that misuse of the controls near the stall could make the glider spin.
- Student attempt, to appreciate the changing effects.
Spin from Stall in an Unbalanced Turn
This shows how the glider behaves in a turn, in both balanced and unbalanced flight. It shows the importance of not over-ruddering a turn.
- HASSELL
- Fly a balanced [right] turn, at a moderate angle of bank, at the normal thermalling speed.
- Stick back to the point of a stall.
- Note that the turn is balanced, and slightly stalled.
- Note the attitude, the yaw string and slip ball: nose is just above the horizon, string is out of the turn [left] and the ball is to the [right] (slipping).
- Recover to wings level.
- Demonstrate an over-ruddered turn:
- Lookout. Turn [right] again, leaving in too much rudder.
- Note the attitude, the yaw string and slip ball: nose is lower on the horizon, string is into the turn [right] and the ball is to the [left] (skidding).
- Stick back, to the stall, glider buffets, and drops a wing, entering a spin.
- Recover from the stall (stick centrally forward, roll wings level, ease out of the dive).
- Note the glider departs into spin much more rapidly in an over-ruddered turn: fly accurately!
Spin off a Steep or Thermal Turn
This shows how the glider can spin if the angle of bank is increased in an unbalanced turn at what appears to be a well banked turn at a safe (normal thermalling) airspeed. The spin entry is likely to be dramatic.
- Describe a scenario, flying low down, in a narrow thermal.
- HASSELL
- Turn at 45 degrees angle of bank, a little above the stalling speed for that bank angle.
- Note the airspeed is X kts, well above the normal stall speed.
- Note the nose appears to be safely below the horizon.
- Gradually increase the rudder into the turn, whilst maintaining attitude with elevator and angle of bank with ailerons. You may need to get the stick hard back as the nose goes down.
- The glider spins. Recover.
- Note the glider departs into spin if a turn is tightened with insufficient airspeed for the new angle of bank, especially if it is also over-ruddered: fly accurately!
Stall and Spin off a (simulated) Winch Launch Failure
This exercise shows that:
- During reduced G, a glider will fly below the normal stalling speed,
- turning before the glider has regained a safe speed can cause the glider to spin, and
- after a push-over, the airspeed can be less than the attitude suggests.
Review the recovery actions following a winch launch failure:
- The Recovery Attitude.
- Avoid turns and use of airbrakes until approach speed is attained.
- Land ahead if safe to do so.
The Flying:
- Demonstrate the normal attitude.
The flying exercise is in three parts:
Part 1 – Slow recovery from a failed winch launch, leading to a mush stall, and recovery.
Describe a slow recovery where the nose is lowered to the normal gliding attitude. If the speed has decayed during the push-over to less than the 1G stall speed, the glider will mush stall.
- HASSELL
- Dive to 70kts, raise nose to winch launch attitude.
- “The launch has failed”
- Lower the nose to the normal attitude, and hold it there.
- Hold the mush briefly, then recover.
Part 2 – Slow recovery from a failed winch launch, attempt to turn while mushed (in approach attitude), leading to a spin.
Describe how if an attempt is made to turn while in the normal attitude, with low speed, per Part 1, the glider will spin, or stall with a wing drop.
- HASSELL, note height (altimeter).
- Dive to 70kts, raise nose to winch launch attitude.
- “The launch has failed”
- Lower the nose to the normal airbrakes-closed approach attitude, and hold it there briefly.
- Immediately turn.
- Glider stalls… “panic”, bringing stick back (to resist the nose drop) and rolling against the wing drop… and spins (or stalls with wing drop, etc).
- Recover as appropriate.
- Note the height lost, and relate it to a low level winch launch failure.
Part 3 – Correct recovery from a winch launch failure.
Describe the correct recovery actions.
- HASSELL.
- Dive to 70kts, raise nose to winch launch attitude.
- “The launch has failed”
- Lower the nose to the recovery attitude.
- Check the ASI, wait for airspeed to reach the nominated approach speed.
- Ask “Can I land ahead?”
- Recover as appropriate.
- Student attempts winch launch recovery.
