Introduction
Aim: You will recognise a launch failure and know how to recover from one.
Why? What is so difficult about them?
A launch failure situation is often:
- Close to the ground
- A moment of stress
- In need of a rapid, and well made, decision.
Recognising a Launch Failure
- What is a ‘launch failure’?
- How can it fail?
- Where can it fail?
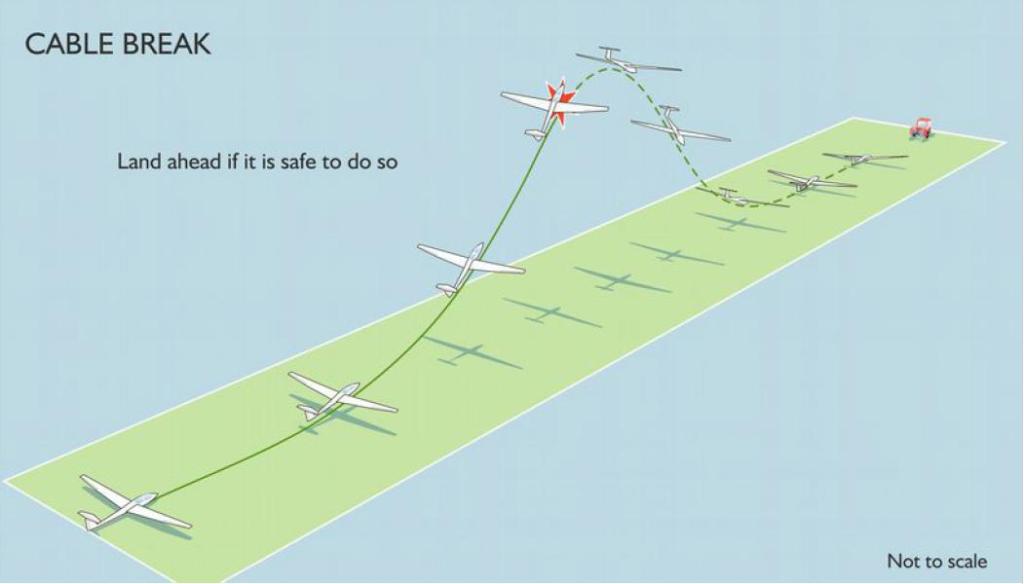
One scenario – note the Trajectory, Attitudes and proximity to the ground, :
The Recovery Process
Recover: immediately move the stick forward to achieve the appropriate recovery attitude. This is usually more nose down than the approach attitude – to allow a rapid acceleration to the approach speed.
- The amount of control movement may range from easing the back pressure to a positive movement forward.
- The extent of the recovery will depend on the height of the launch failure (and hence the attitude of the glider).
- Take great care if the launch failure is at a low level.
Wait: it can take several seconds to reach the approach speed, as determined in Eventualities
Assess: the situation while waiting for speed to build:
- Only when at the approach speed, in the approach attitude, can a reliable decision be made.
Plan: a Safe Approach & Landing
- Land ahead if it is safe to do so.
Monitor: the ASI
Fly: the Approach and Landing: String, Speed, Lookout
Circuit Options
If you cannot land ahead, what are your options?
- What is permitted?
- Where can you land?
Airbrakes
- Do not open the airbrakes until the approach speed has been achieved, at the earliest.
- Caution when opening airbrakes close to the ground:
- Depending on the glider, beware of pitch changes.
- Consider initially opening them only to get past the over-centre lock (to avoid any pitch changes) – then ease them open to overcome ground effect and to stabilise the glider.
Scenarios – you decide…
What would you do, and why?

Recap
How do you recognise a failure?
What actions do you take if the launch fails?
TEM
Stall / Spin: take great care when turning at a low height.
Collision: notably with other aircraft already in circuit.
Losing sight of the Landing Area: it may be behind you.
Flight Exercises
Upper Air demonstration
Simulate a launch failure in the full climb. The aim is for the student to learn the correct rate and amount of push over, and to wait to regain a safe approach speed.
- HASSELL
- Increase speed to c. 70kts, then pull up to c. 45 degree climb.
- State the launch has failed.
- Lower the nose to the recovery attitude.
- Wait for speed to increase to the nominated approach speed.
- Ask “Can I land ahead?”
- Student attempts, until coping well.
Straight Ahead Launch Failure
- Demonstrate the simulated failure at a height where the land ahead option is the only option.
- Debrief, including whilst there is no time to waste, there is ample time to correct the attitude, regain speed, make the decision and execute a safe approach and landing.
- Student attempts: monitor closely, and in the case of errors, take-over immediately.
Launch Failure Requiring a Modified Circuit
- Demonstrate the simulated failure at a height where the need for a modified circuit is the only option.
- If the simulated launch failure occurred such that it is possible to land ahead, then do so.
- Debrief, including whilst there is no time to waste, there is ample time to correct the attitude, regain speed, make the decision and execute a safe circuit, approach and landing.
- Student attempts: monitor closely, and in the case of errors, take-over immediately.
Ultra-low Level Launch Failure
- Demonstration only.
- The simulated launch failure must be initiated by the winch (depowering).
- Beware that if delayed even slightly, you will be higher than intended: adapt accordingly and fly the failure you have.
- Debrief:
- noting the caution with which the attitude is altered,
- the delay and caution when opening the airbrakes close to the ground,
- the stick was not ‘pushed’ forward.

