This lesson shows how to recognise and manage a developing overshoot.

Learning Points
An overshoot means you will fly past the intended landing area. It can be recognised by seeing the Reference Point (RP) too low in the canopy, or moving down in your view, or even under the nose.
If the overshoot area is unlandable, or you want to land in the chosen area, you must respond and correct it.
When you recognise an overshoot developing, open the airbrakes fully. Settle the glider at the intended approach speed, and aim to intersect the normal (ideally two thirds airbrake) descent path, which will be below you. As and when the picture looks correct, close the airbrakes to two thirds, settle again at the approach speed and assess the situation. Adjust if necessary.
It may be necessary to keep the airbrakes open more than two-thirds for some time, or even all the way down, after adjusting to control the overshoot. This will be the case if the RP is not coming back fully as intended. Consider your other options: can you land further into the field or into an overshoot area? If not, keep the airbrakes open as required, and bear in mind that if rounding out with the airbrakes fully open, the stall speed will be several knots higher, and it is safer to do so by starting a gentler round-out a little higher than normal.
Scenario and Demonstration
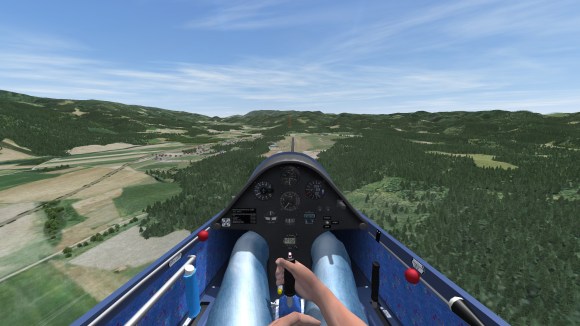
The demonstration is one of a set on Approach Control. They all start a long way out to exaggerate the points being shown. The intended landing area is the closest (downwind) end of the runway. We are landing into a 10kt headwind. The Reference Point is the piano keys marking at the closest end of the runway. We aim to round out just above them.
The top picture shows the glider on approach at 650ft, flying at just over 50kts with the airbrakes open two-thirds (60% in Condor). Previous experience tells us that in this configuration we should hold the RP steady in our view just below the string in order to round out just above it. All being well, we would expect to continue all the way to the RP at this speed with no further adjustment of the airbrakes.
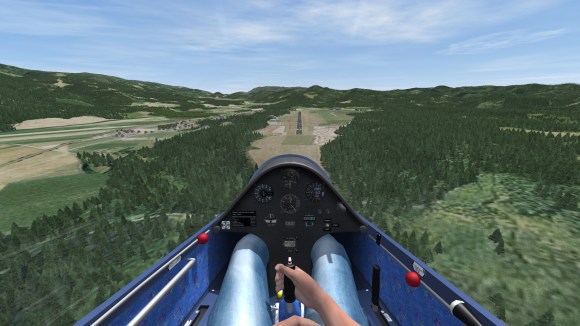
However, instead of following the path to the RP, we want to demonstrate the overshoot. So we close the airbrakes as shown in the second picture at 600ft. The RP has clearly disappeared beneath the nose, and if we do nothing else we will probably fly well beyond the far end of the airfield, with nowhere to land.
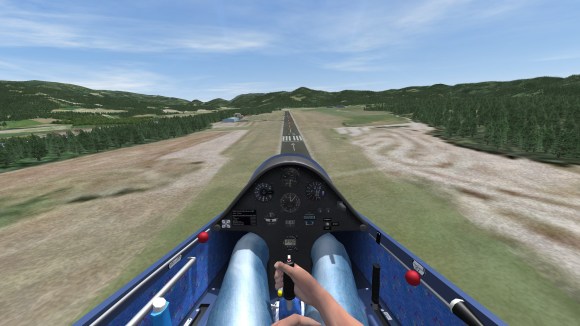
Having recognised the overshoot, we open the airbrakes fully in order to descend to the normal “two-thirds airbrake” approach path. The third picture shows that at 400ft the airbrakes are still fully open as we descend more steeply, and the RP is back in view – note that due to the change in attitude resulting from fully opening the airbrakes, the glider is somewhat nose down. We must take this into account when assessing the position of the RP in our view.
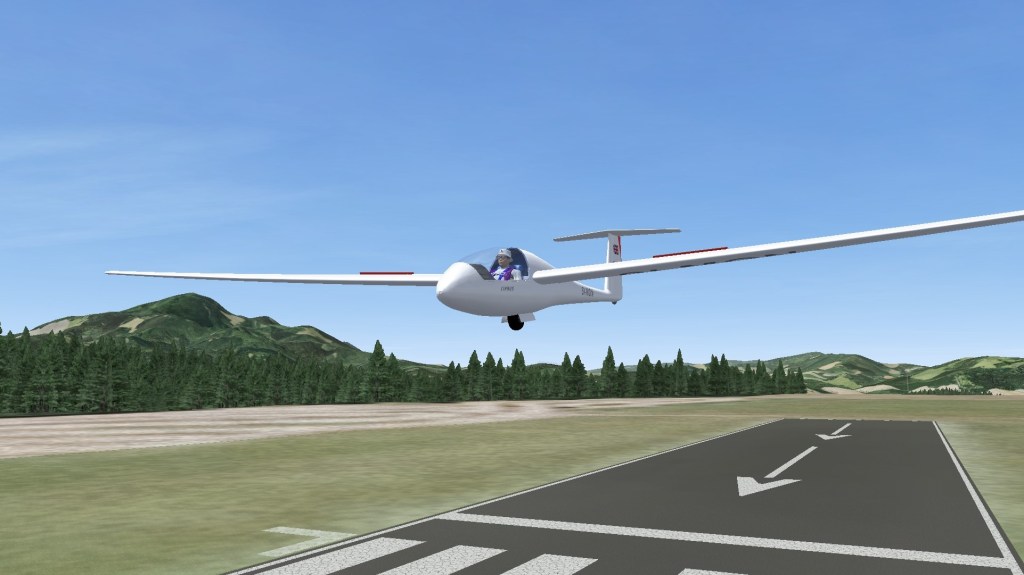
When we reach the normal two-thirds airbrake descent path, we close the airbrakes to two-thirds. This is shown in the fourth picture – airspeed is just above 50kts, we are at 100 feet, and the RP is where we want it in our view. We should now continue to the RP for a smooth round-out at a safe height and speed, as intended.
In gusty conditions or if there is a significant wind gradient, then we must stay alert to a loss of airspeed and possibly descending too rapidly. Adjust the controls to maintain speed and the position of the RP in your view.
These videos are suited to viewing on any device supported by YouTube. The animated version describes what is happening, and the pilot’s thinking. The unanimated version is suited to use with an instructor.
Performing the Exercise
In real life, the instructor will advise you as to what is required. There are several ways to practise this exercise in Condor. You can either leave opening the airbrakes a bit too long and watch as the overshoot develops, and then respond to it, or for more of a challenge, settle into a normal two-thirds airbrake approach, then close the airbrakes to see the overshoot develop. Fully open them to descend as required and when you reach the normal approach path adjust the airbrakes to two thirds to reach the RP.
Note how the RP moves beneath the nose, and so too do the runway markings if you can see them.
Further Reading and References
- Gliding From Passenger to Pilot, 2nd Edition: Page 108-111
- BGA Instructors’ Manual, 4th Edition: Section 2, Chapter 12
- BGA Instructors’ Reference Cards: Ex 12c
- Gliding: The British Gliding Association Student Pilot Manual, Section 4.9 and website.
Updates
The GlidingSchool.com lessons were developed for Condor2. They will be updated from time to time. Visit the Downloads page for news of updates, and to request the latest version.
Comments and Feedback
Your comments and feedback would be welcome. Visit the Contact page to send your thoughts.
Forums
Join us on the Forums provided by Condor Soaring and GliderPilot.net (the URAS forum).
